Building Rich Text Editors in React
draft-js is a rich text editor framework developed by Meta that provides the core state management and rendering engine for building custom editors in React. react-draft-wysiwyg is a community-maintained wrapper built on top of draft-js that supplies a pre-configured user interface, including toolbars and buttons, to speed up development. While draft-js offers a headless approach requiring you to construct the UI, react-draft-wysiwyg delivers a batteries-included experience out of the box. Developers should note that draft-js is no longer actively developed by Meta, which impacts the long-term viability of both packages for new projects.
Npm Package Weekly Downloads Trend
Github Stars Ranking
Stat Detail


Draft.js vs React-Draft-Wysiwyg: Architecture, Setup, and Maintenance
Both draft-js and react-draft-wysiwyg aim to solve the complex problem of building rich text editors in React applications, but they operate at different layers of the stack. draft-js provides the core engine for managing editor state and content, while react-draft-wysiwyg wraps that engine to provide a ready-to-use interface. Understanding the distinction between the core library and the UI wrapper is critical for making the right architectural choice.
⚠️ Important Maintenance Status
Before diving into technical details, it is essential to address the current status of these libraries. Meta has announced that draft-js is no longer actively developed and they recommend migrating to Lexical for new projects. Since react-draft-wysiwyg depends entirely on draft-js, it shares this maintenance risk. For greenfield projects requiring long-term support, evaluating modern alternatives like Lexical, TipTap, or Slate is strongly advised. The following comparison assumes you have a specific requirement to use these packages, such as maintaining legacy code or specific compatibility needs.
🏗️ Architecture: Core Engine vs UI Wrapper
draft-js is a headless framework. It gives you the Editor component and the EditorState management, but it does not provide a toolbar, bold buttons, or link inputs. You must build these UI controls yourself and wire them to the editor commands.
// draft-js: Manual UI implementation
import { Editor, EditorState, RichUtils } from 'draft-js';

function MyEditor({ editorState, onChange }) {
  const toggleBold = () => {
    onChange(RichUtils.toggleInlineStyle(editorState, 'BOLD'));
  };

  return (
    <div>
      <button onClick={toggleBold}>B</button>
      <Editor editorState={editorState} onChange={onChange} />
    </div>
  );
}
react-draft-wysiwyg wraps the draft-js Editor and provides a pre-built toolbar component. You configure the toolbar via a props object, and the package handles the button logic and rendering for you.
// react-draft-wysiwyg: Pre-built UI
import { Editor } from 'react-draft-wysiwyg';

function MyEditor({ editorState, onChange }) {
  return (
    <Editor
      editorState={editorState}
      onEditorStateChange={onChange}
      toolbar={{
        inline: { inDropdown: false },
        options: ['inline', 'blockType', 'list']
      }}
    />
  );
}
🚀 Setup and Initialization
Setting up draft-js requires more boilerplate. You need to manage the EditorState in your parent component and handle the onChange event explicitly. You also need to import CSS for the base editor functionality.
// draft-js: Manual state management
import { EditorState } from 'draft-js';
import { useState } from 'react';

function App() {
  const [editorState, setEditorState] = useState(() =>
    EditorState.createEmpty()
  );

  return (
    <div className="editor-container">
      <MyEditor
        editorState={editorState}
        onChange={setEditorState}
      />
    </div>
  );
}
react-draft-wysiwyg simplifies this by exporting a ready-to-use Editor component that still requires state management but reduces the need for surrounding UI logic. It also includes default styling that makes it look functional immediately.
// react-draft-wysiwyg: Simplified setup
import { Editor } from 'react-draft-wysiwyg';
import { useState } from 'react';

function App() {
  const [editorState, setEditorState] = useState(() =>
    EditorState.createEmpty()
  );

  return (
    <div className="rdw-editor-wrapper">
      <Editor
        editorState={editorState}
        onEditorStateChange={setEditorState}
      />
    </div>
  );
}
🎨 Customizing Block Rendering
When you need custom blocks (like tweets, embeds, or special alerts), both packages rely on the same underlying draft-js mechanism. However, react-draft-wysiwyg allows you to pass these configurations through its wrapper props.
draft-js requires you to define a blockRenderMap and a component map, then pass them to the Editor.
// draft-js: Custom block map
const blockRenderMap = Immutable.Map({
  'alert': { element: 'div' }
});

function MyEditor({ editorState, onChange }) {
  return (
    <Editor
      editorState={editorState}
      onChange={onChange}
      blockRenderMap={blockRenderMap}
      blockRendererFn={(block) => {
        if (block.getType() === 'alert') {
          return { component: AlertBlockComponent };
        }
      }}
    />
  );
}
react-draft-wysiwyg accepts the same props since it passes them down to the internal draft-js Editor. The difference is you configure this within the wrapper component.
// react-draft-wysiwyg: Custom block config
function MyEditor({ editorState, onChange }) {
  return (
    <Editor
      editorState={editorState}
      onEditorStateChange={onChange}
      blockRenderMap={blockRenderMap}
      blockRendererFn={(block) => {
        if (block.getType() === 'alert') {
          return { component: AlertBlockComponent };
        }
      }}
    />
  );
}
💾 Data Serialization: HTML and JSON
Both packages use ContentState to serialize data. You can convert the editor content to JSON for storage or HTML for display elsewhere. The API for this is identical because react-draft-wysiwyg uses the draft-js conversion utilities.
Exporting to JSON
// Both packages: Convert to JSON
import { convertToRaw } from 'draft-js';

const contentState = editorState.getCurrentContent();
const rawContent = convertToRaw(contentState);
// Save rawContent to database
Exporting to HTML
// Both packages: Convert to HTML
import { stateToHTML } from 'draft-js-export-html';

const html = stateToHTML(editorState.getCurrentContent());
// Send HTML to backend or render in viewer
🛠️ Toolbar Configuration
This is the biggest differentiator. With draft-js, you build the toolbar. With react-draft-wysiwyg, you configure it.
draft-js requires you to create buttons that call RichUtils or Modifier functions. You handle active states (e.g., is the cursor currently on bold text?) manually.
// draft-js: Manual toolbar logic
const isBold = editorState.getCurrentInlineStyle().has('BOLD');

<button
  className={isBold ? 'active' : ''}
  onMouseDown={(e) => {
    e.preventDefault();
    onChange(RichUtils.toggleInlineStyle(editorState, 'BOLD'));
  }}
>
  Bold
</button>
react-draft-wysiwyg lets you define options in a configuration object. You can hide specific features or change the layout without writing button logic.
// react-draft-wysiwyg: Config-based toolbar
<Editor
  editorState={editorState}
  onEditorStateChange={onChange}
  toolbar={{
    options: ['inline', 'blockType', 'fontSize', 'list'],
    inline: { options: ['BOLD', 'ITALIC', 'UNDERLINE'] },
    blockType: { inDropdown: true }
  }}
/>
📊 Summary: Key Differences
| Feature | draft-js | react-draft-wysiwyg |
|---|---|---|
| UI Components | ❌ None (Headless) | ✅ Pre-built Toolbar & Editor |
| Setup Time | 🐢 Slower (Build UI from scratch) | 🚀 Faster (Configuration based) |
| Customization | 🎨 Unlimited (You own the DOM) | ⚙️ High (Config + Overrides) |
| Dependencies | 📦 draft-js, immutable | 📦 draft-js, immutable, react-draft-wysiwyg |
| Maintenance | ⚠️ Long-term Support (Meta) | ⚠️ Community (Dependent on Draft.js) |
| Bundle Size | 📉 Core Logic Only | 📈 Core Logic + UI Components |
🤝 Similarities: Shared Foundation
Since react-draft-wysiwyg is built on draft-js, they share the same core behaviors and limitations.
1. Immutable.js Dependency
Both packages rely on Immutable.js for state management. This can introduce friction when integrating with modern React patterns that prefer plain objects.
// Both: Accessing content requires Immutable methods
const content = editorState.getCurrentContent();
const text = content.getFirstBlock().getText();
2. ContentState Model
Both use the same ContentState data structure. Migration between the two is easy because the underlying state is compatible.
// Both: Creating state from raw data
const contentState = convertFromRaw(rawData);
const editorState = EditorState.createWithContent(contentState);
3. Plugin System
Both support the Draft.js plugin ecosystem (e.g., draft-js-plugins). You can add mentions, emojis, or links using the same plugins in either package.
// Both: Using plugins
import createLinkPlugin from 'draft-js-anchor-plugin';
const linkPlugin = createLinkPlugin();

// Pass plugins to Editor in both cases
<Editor plugins={[linkPlugin]} ... />
💡 The Big Picture
draft-js is the engine under the hood. It is best suited for teams that need to build a highly custom editing experience where the toolbar and editor chrome must match a specific design system perfectly. It requires more engineering effort but offers total control.
react-draft-wysiwyg is the complete vehicle. It is best suited for teams that need a functional editor quickly and are happy with a standard toolbar layout. It reduces development time significantly but adds a layer of abstraction over the core engine.
Final Thought: Both packages rely on technology that is no longer the primary focus of Meta. For new projects, consider if the short-term gain of these libraries outweighs the long-term cost of maintaining a deprecated stack. If you must choose between them, pick react-draft-wysiwyg for speed and draft-js for control — but keep an eye on migration paths to modern alternatives like Lexical.
How to Choose: draft-js vs react-draft-wysiwyg
- draft-js:
Choose
draft-jsif you require complete control over the editor's UI and behavior, and you are prepared to build custom toolbar components and styling from scratch. This package is suitable for teams that need a highly tailored editing experience and can manage the maintenance burden of a library in long-term support mode. It is best used when you need to deeply customize block rendering or integrate with an existing design system that a wrapper might constrain. - react-draft-wysiwyg:
Choose
react-draft-wysiwygif you need to ship a functional rich text editor quickly with a standard toolbar and minimal setup effort. This package is ideal for internal tools, admin panels, or prototypes where a default WYSIWYG interface is acceptable and development speed is a priority. However, be aware that you inherit the limitations and maintenance status of the underlyingdraft-jsengine, so evaluate long-term support needs carefully.
Popular Comparisons
README for draft-js

Draft.js


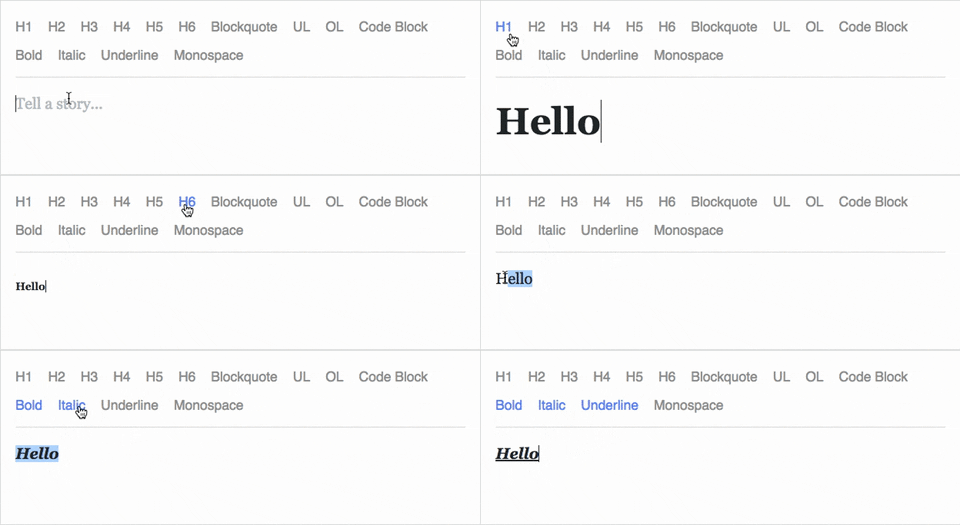
Draft.js is a JavaScript rich text editor framework, built for React and backed by an immutable model.
- Extensible and Customizable: We provide the building blocks to enable the creation of a broad variety of rich text composition experiences, from basic text styles to embedded media.
- Declarative Rich Text: Draft.js fits seamlessly into React applications, abstracting away the details of rendering, selection, and input behavior with a familiar declarative API.
- Immutable Editor State: The Draft.js model is built with immutable-js, offering an API with functional state updates and aggressively leveraging data persistence for scalable memory usage.
Learn how to use Draft.js in your own project.
API Notice
Before getting started, please be aware that we recently changed the API of
Entity storage in Draft. The latest version, v0.10.0, supports both the old
and new API. Following that up will be v0.11.0 which will remove the old API.
If you are interested in helping out, or tracking the progress, please follow
issue 839.
Getting Started
npm install --save draft-js react react-dom

or

yarn add draft-js react react-dom
Draft.js depends on React and React DOM which must also be installed.
Using Draft.js
import React from 'react';
import ReactDOM from 'react-dom';
import {Editor, EditorState} from 'draft-js';

class MyEditor extends React.Component {
  constructor(props) {
    super(props);
    this.state = {editorState: EditorState.createEmpty()};
    this.onChange = (editorState) => this.setState({editorState});
    this.setEditor = (editor) => {
      this.editor = editor;
    };
    this.focusEditor = () => {
      if (this.editor) {
        this.editor.focus();
      }
    };
  }

  componentDidMount() {
    this.focusEditor();
  }

  render() {
    return (
      <div style={styles.editor} onClick={this.focusEditor}>
        <Editor
          ref={this.setEditor}
          editorState={this.state.editorState}
          onChange={this.onChange}
        />
      </div>
    );
  }
}

const styles = {
  editor: {
    border: '1px solid gray',
    minHeight: '6em'
  }
};

ReactDOM.render(
  <MyEditor />,
  document.getElementById('container')
);
Since the release of React 16.8, you can use Hooks as a way to work with EditorState without using a class.
import React from 'react';
import ReactDOM from 'react-dom';
import {Editor, EditorState} from 'draft-js';

function MyEditor() {
  const [editorState, setEditorState] = React.useState(
    EditorState.createEmpty()
  );

  const editor = React.useRef(null);

  function focusEditor() {
    editor.current.focus();
  }

  React.useEffect(() => {
    focusEditor()
  }, []);

  return (
    <div onClick={focusEditor}>
      <Editor
        ref={editor}
        editorState={editorState}
        onChange={editorState => setEditorState(editorState)}
      />
    </div>
  );
}
Note that the editor itself is only as tall as its contents. In order to give users a visual cue, we recommend setting a border and a minimum height via the .DraftEditor-root CSS selector, or using a wrapper div like in the above example.
Because Draft.js supports unicode, you must have the following meta tag in the <head> </head> block of your HTML file:
<meta charset="utf-8" />
Further examples of how Draft.js can be used are provided below.
Examples
Visit http://draftjs.org/ to try out a basic rich editor example.
The repository includes a variety of different editor examples to demonstrate some of the features offered by the framework.
To run the examples, first build Draft.js locally. The Draft.js build is tested with Yarn v1 only. If you're using any other package manager and something doesn't work, try using yarn v1:
git clone https://github.com/facebook/draft-js.git
cd draft-js
yarn install
yarn run build
then open the example HTML files in your browser.
Draft.js is used in production on Facebook, including status and comment inputs, Notes, and messenger.com.
Browser Support
 IE / Edge |  Firefox |  Chrome |  Safari |  iOS Safari | Chrome for Android |
|---|---|---|---|---|---|
| IE11, Edge [1, 2] | last 2 versions | last 2 versions | last 2 versions | not fully supported [3] | not fully supported [3] |
[1] May need a shim or a polyfill for some syntax used in Draft.js (docs).
[2] IME inputs have known issues in these browsers, especially Korean (docs).
[3] There are known issues with mobile browsers, especially on Android (docs).
Resources and Ecosystem
Check out this curated list of articles and open-sourced projects/utilities: Awesome Draft-JS.
Discussion and Support
Join our Slack team!
Contribute
We actively welcome pull requests. Learn how to contribute.
License
Draft.js is MIT licensed.
Examples provided in this repository and in the documentation are separately licensed.