Capturing Images from Webcams in React and Vanilla JS
These three libraries enable developers to access user webcams and capture photos directly within web applications. react-webcam is a React component that provides direct access to the video stream and screenshot capabilities. react-html5-camera-photo is a React wrapper designed specifically for taking photos with built-in callbacks. jslib-html5-camera-photo is the underlying vanilla JavaScript library that powers the React wrapper, suitable for non-React projects or lower-level integration.
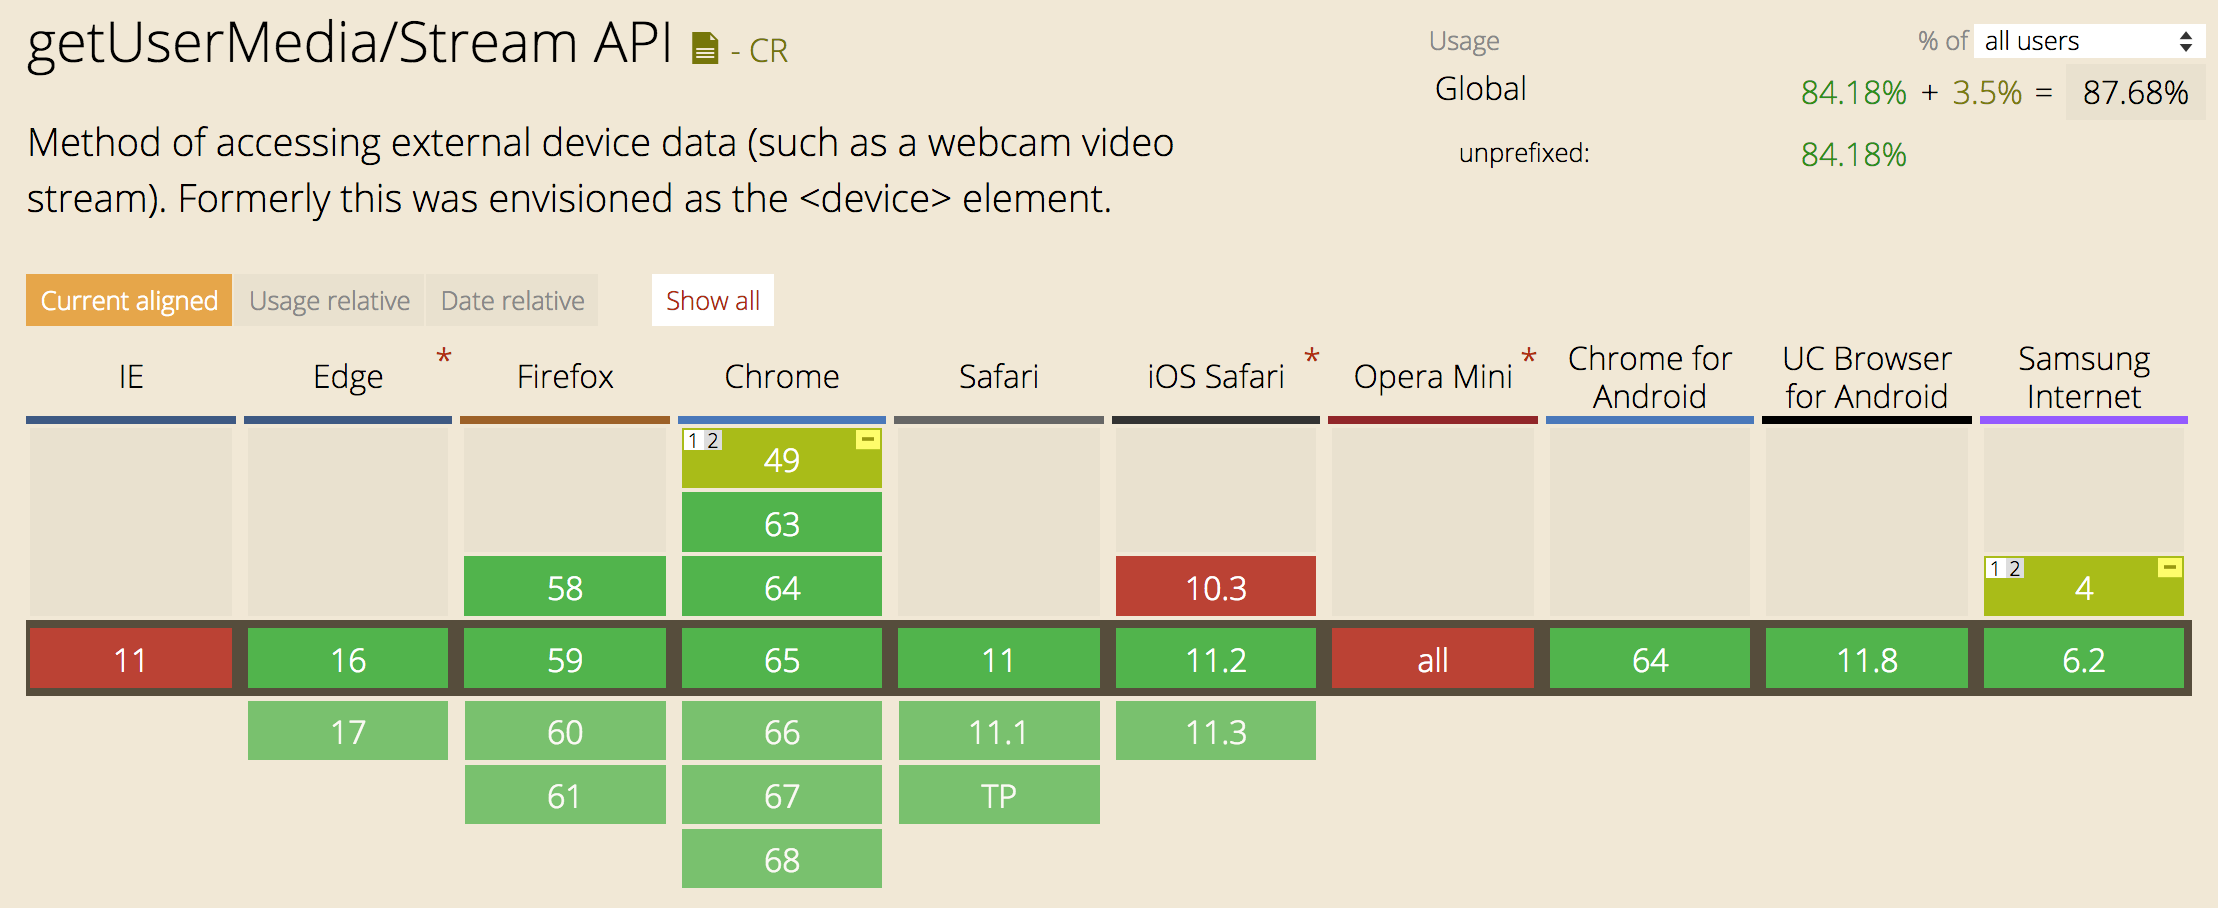
Npm Package Weekly Downloads Trend
Github Stars Ranking
Stat Detail
Webcam Image Capture: react-webcam vs react-html5-camera-photo vs jslib-html5-camera-photo
Accessing a user's camera in a web application requires handling permissions, video streams, and canvas rendering. The packages react-webcam, react-html5-camera-photo, and jslib-html5-camera-photo all solve this problem but approach it from different angles. Let's compare how they handle core tasks like initialization, capturing images, and configuration.
📦 Core Architecture: Component vs Library
react-webcam is a pure React component.
- It renders a
<video>element internally. - You interact with it using React refs to trigger actions.
- Best for standard React applications where you want to keep logic inside components.
// react-webcam: Component usage
import Webcam from "react-webcam";

function MyComponent() {
  const webcamRef = useRef(null);
  return <Webcam ref={webcamRef} />;
}
react-html5-camera-photo is also a React component but wraps specific capture logic.
- It focuses on the "take photo" action as a primary event.
- It uses callbacks to return the image data immediately upon capture.
- Useful when the capture action is the main goal of the component.
// react-html5-camera-photo: Component usage
import Camera from "react-html5-camera-photo";

function MyComponent() {
  const handlePhoto = (dataUri) => console.log(dataUri);
  return <Camera onTakePhoto={handlePhoto} />;
}
jslib-html5-camera-photo is a vanilla JavaScript library.
- It does not depend on React or any framework.
- You must manually attach it to a DOM element (like a
<video>tag). - Ideal for vanilla JS projects or when you need to avoid React overhead.
// jslib-html5-camera-photo: Vanilla JS usage
import { CameraPhoto } from "jslib-html5-camera-photo";

const cameraPhoto = new CameraPhoto("#video-element");
cameraPhoto.startCamera();
📸 Capturing Images: Manual Trigger vs Callback
The way you retrieve the image data differs significantly between these tools.
react-webcam requires you to call a method on the ref.
- You decide exactly when the screenshot happens (e.g., on button click).
- Returns a base64 string of the current video frame.
- Gives you full control over timing.
// react-webcam: Manual capture
const takeShot = () => {
  const imageSrc = webcamRef.current.getScreenshot();
  console.log(imageSrc);
};

<button onClick={takeShot}>Capture</button>
react-html5-camera-photo uses a prop callback.
- The component handles the capture logic internally.
- You provide a function to receive the data URI automatically.
- Less boilerplate but less control over the exact trigger moment.
// react-html5-camera-photo: Callback capture
const handlePhoto = (dataUri) => {
  console.log(dataUri);
};

<Camera onTakePhoto={handlePhoto} />;
jslib-html5-camera-photo uses a class method.
- You call
takePhoto()on the instance. - Returns a promise or data URI depending on configuration.
- Requires manual DOM management alongside the logic.
// jslib-html5-camera-photo: Method capture
const photoData = cameraPhoto.takePhoto();
console.log(photoData);
⚙️ Configuration: Video Constraints and Settings
Configuring resolution, aspect ratio, and image format is critical for performance and quality.
react-webcam passes constraints directly to the video element.
- Uses the standard
videoConstraintsprop. - Supports width, height, and facing mode (user/environment).
- Aligns closely with native MediaStream constraints.
// react-webcam: Video constraints
<Webcam
  videoConstraints={{
    width: 1280,
    height: 720,
    facingMode: "user"
  }}
/>
react-html5-camera-photo uses specific props for image output.
- Uses
imageTypeto set format (jpg/png). - Uses
resultTypeto define output (base64/uint8array). - Video constraints are passed similarly but focused on capture output.
// react-html5-camera-photo: Image settings
<Camera
  imageType="jpg"
  resultType="base64"
  idealResolution={{ width: 1280, height: 720 }}
/>
jslib-html5-camera-photo configures via constructor or methods.
- You set options when initializing the class.
- Provides low-level control over the canvas and stream.
- Requires more setup code to achieve the same result.
// jslib-html5-camera-photo: Initialization options
const options = {
  width: 1280,
  height: 720,
  imageType: "jpg"
};
const cameraPhoto = new CameraPhoto("#video", options);
🛠️ Maintenance and Ecosystem Support
Long-term project health depends on library maintenance and community support.
react-webcam has consistent updates and wide adoption.
- Actively maintained with regular fixes for React versions.
- Large community means easier troubleshooting.
- Safe choice for production enterprise applications.
// react-webcam: Standard import
import Webcam from "react-webcam";
// Widely supported in current React versions
react-html5-camera-photo has had periods of low activity.
- Some users report issues with newer React strict mode.
- Fewer contributors compared to
react-webcam. - Use with caution in long-term projects without a fork strategy.
// react-html5-camera-photo: Potential compatibility check
import Camera from "react-html5-camera-photo";
// Verify React version compatibility before install
jslib-html5-camera-photo is stable but niche.
- Updates depend on the core
html5-camera-photoproject. - Good for specific non-React use cases.
- Less community support for React-specific integration issues.
// jslib-html5-camera-photo: Vanilla stability
import { CameraPhoto } from "jslib-html5-camera-photo";
// Stable API for vanilla JS contexts
📊 Summary: Key Differences
| Feature | react-webcam | react-html5-camera-photo | jslib-html5-camera-photo |
|---|---|---|---|
| Framework | ⚛️ React | ⚛️ React | 🌐 Vanilla JS |
| Capture Method | 🖱️ Manual (ref method) | 🔄 Callback (prop) | 🖱️ Manual (class method) |
| Configuration | 🎛️ videoConstraints | 🎛️ imageType/resultType | 🎛️ Constructor options |
| Maintenance | ✅ Active | ⚠️ Less Active | ✅ Stable |
| Best Use | 🏢 General React Apps | 📸 Photo-First Components | 🛠️ Non-React Projects |
💡 Final Recommendation
react-webcam is the standard choice for React developers.
It balances flexibility with stability and fits naturally into the React component model. Use it for dashboards, profile uploads, or any feature where webcam access is part of a larger interface.
react-html5-camera-photo works well for simple photo booths.
If your sole goal is to take a picture and you want the data handed to you automatically, this reduces boilerplate. Just ensure you test it thoroughly with your specific React version.
jslib-html5-camera-photo is for vanilla JavaScript needs.
Reach for this when you are not using React or need to integrate camera logic into a legacy codebase without framework dependencies. It provides the foundation that the React wrappers are built upon.
How to Choose: jslib-html5-camera-photo vs react-html5-camera-photo vs react-webcam
- jslib-html5-camera-photo:
Choose
jslib-html5-camera-photoif you are building a vanilla JavaScript application or using a framework other than React. It provides direct access to the camera hardware without React-specific dependencies. This option gives you full control over the implementation but requires more boilerplate code to manage the video element and canvas rendering manually. - react-html5-camera-photo:
Choose
react-html5-camera-photoif you need a React component that handles the photo capture logic internally via callbacks. It simplifies the process by exposing anonTakePhotoprop instead of requiring manual screenshot triggers. However, verify compatibility with your React version, as maintenance has been less consistent compared to other options. - react-webcam:
Choose
react-webcamfor most React projects requiring stable, long-term support and active maintenance. It offers a straightforward API to access the video stream and capture screenshots on demand. This package is ideal when you need flexibility to customize the video constraints and handle the capture action separately from the component rendering.
Popular Comparisons
README for jslib-html5-camera-photo
jslib-html5-camera-photo
The first objective of this package comes from the need to have a js library that can help me to capture picture from mobile or desktop camera through the browser with the HTML5 video and canvas elements. So instead of using the native navigator.mediaDevices.getUserMedia() and manage the stream and the constraints, i need an abstraction it into a small lib that can switch between camera and get the desired resolution.
Another js camera ? Yes! I found webcamjs and jpeg_camera but i need to switch easily from camera environment and user. You need to build the constraint for getUserMedia()... Another need is to have a sizeFactor instead of a fixing 'width' and 'height' that can not fit with the ratio of the resolution that camera can pick.
Features of the library.
- Choose between
facing modeordeviceIdcamera, fall back to the default camera. - Set
ideal resolution, fall back to the default resolution. - Get the
maximum resolutionof the camera, fall back to the default resolution. - Choose dataURI
image formattype betweenjpgorpng. - If image format is
jpg, choose thecompression valueis the between [0, 1]. - Choose dataURI
image mirrorif you want to get an mirror dataURI of the camera.
Simple Live Demo
https://mabelanger.github.io/jslib-html5-camera-photo/
supported browsers (getUserMedia)
https://caniuse.com/#search=getUserMedia
 ...(as April 2018)
Available camera facingModes
| FACING_MODES [] | Description |
|---|---|
| USER | The source is facing toward the user (a self-view camera). |
| ENVIRONMENT | The source is facing away from the user (viewing the environment). |
Below is an illustration of the video facing modes in relation to the user.
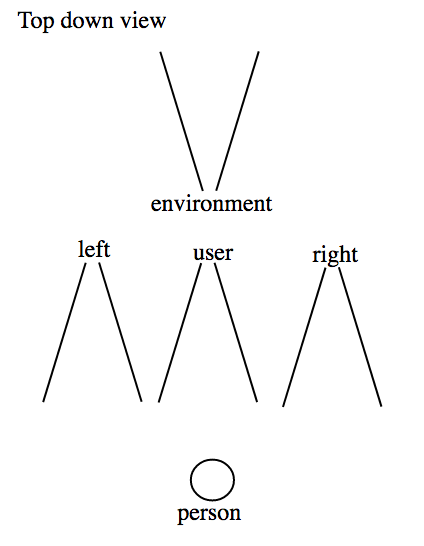
src : https://www.w3.org/TR/mediacapture-streams/#dom-videofacingmodeenum
Getting started
You can use the library with vanilla JavaScript, React, Jquery, Angular...
Installation
npm install --save jslib-html5-camera-photo
yarn add jslib-html5-camera-photo
Usage
Constructor
import CameraPhoto, { FACING_MODES, IMAGE_TYPES } from 'jslib-html5-camera-photo';

// get your video element with his corresponding id from the html
let videoElement = document.getElementById('videoId');

// pass the video element to the constructor.
let cameraPhoto = new CameraPhoto(videoElement);
parameters of startCamera
cameraPhoto.startCamera(cameraDevice, resolution)
| parameters | Description |
|---|---|
| cameraDevice | Is the string of the camera facingMode or deviceId |
| resolution | Is the object resolution ex:. { width: 640, height: 480 } |
Start the default mode (facing Mode & resolution)
If you do not specify any prefer resolution and facing mode, the default is used. The function return a promise. If the promises success it will give you the stream if you want to use it. If it fail, it will give you the error.
// default camera and resolution
cameraPhoto.startCamera()
  .then((stream)=>{/* ... */})
  .catch((error)=>{/* ... */});
Start with ideal facing Mode & default resolution
// environment (camera point to environment)
cameraPhoto.startCamera(FACING_MODES.ENVIRONMENT, {})
  .then((stream)=>{/* ... */})
  .catch((error)=>{/* ... */});

// OR user (camera point to the user)
cameraPhoto.startCamera(FACING_MODES.USER, {})
  .then((stream)=>{/* ... */})
  .catch((error)=>{/* ... */});
Start with a user-selected deviceId & default resolution
Instead of facing mode, you can specify the deviceId (camera) that you want to use. To know the device id you can get a list of them using see Enumerate the available cameras, so you can start the camera with the deviceId instead of facing mode, e.g.
// OR specify the deviceId (use a specific camera)
const deviceId = 'the_string_of_device_id';
cameraPhoto.startCamera(deviceId, {})
  .then((stream)=>{/* ... */})
  .catch((error)=>{/* ... */});
Start with ideal (facing Mode & resolution)
// example of ideal resolution 640 x 480
cameraPhoto.startCamera(facingMode, {width: 640, height: 480})
  .then((stream)=>{/* ... */})
  .catch((error)=>{/* ... */});
Start with the maximum resolution
It will try the range of width [3840, 2560, 1920, 1280, 1080, 1024, 900, 800, 640, default] px to take the maximum width of 3840px if it can't, 2560px and so on ... until the fall back of the default value of the camera. The facingMode is optional.
// It will try the best to get the maximum resolution with the specified facingMode
cameraPhoto.startCameraMaxResolution(cameraDevice)
  .then((stream)=>{/* ... */})
  .catch((error)=>{/* ... */});
getDataUri()
Function that return the dataUri of the current frame of the camera.
To use that function build the configuration object with the corresponding properties. To use the default value, just ommit the parameter:
Parameter (object config)
-
sizeFactor (Number): Used to get a desired resolution. Example, a sizeFactor of
1get the same resolution of the camera while sizeFactor of0.5get the half resolution of the camera. The sizeFactor can be between range of]0, 1]and the default value is1. -
imageType (String): Used to get the desired image type between
jpgorpng. to specify the imageType use the constant IMAGE_TYPES, for example to specify jpg format use IMAGE_TYPES.JPG. The default imageType ispng. -
imageCompression (Number): Used to get the desired compression when
jpgis selected. choose a compression between[0, 1], 1 is maximum, 0 is minimum. The default value imageCompression is0.92. -
isImageMirror (Boolean): Used to get an image mirror when is set to
true, the result of thedataUriis the mirror of the actual camera data. Many software that use camera mirror like hangout etc... Please note if you want to enable this option, for consistency with the camera video, you need to use csstransform: rotateY(180deg)to the <video> tag to mirror the stream, because the stream is not mirrored. It's only apply to the canvas dataUri. The default value isfalse(no mirror).
Available image types
| IMAGE_TYPES [] | Description |
|---|---|
| JPG | set image image/jpeg to the data URI |
| PNG | set image image/png to the data URI (the default value) |
// Use all the default value
const config = {};
let dataUri = cameraPhoto.getDataUri(config);

// OR

// Specify sizeFactor, imageType, imageCompression, isImageMirror
const config = {
  sizeFactor : 1;
  imageType : IMAGE_TYPES.JPG
  imageCompression : .95;
  isImageMirror : false;
}

let dataUri = cameraPhoto.getDataUri(config);
Get the camera settings
the function return null if no stream exist (camera not started) or an object with the camera settings attributes of (aspectRatio, frameRate, height, width).
let cameraSettigs = cameraPhoto.getCameraSettings();
if (cameraSettigs) {
  let {aspectRatio, frameRate, height, width} = cameraSettigs;
  let settingsStr =
      `aspectRatio:${aspectRatio} ` +
      `frameRate: ${frameRate} ` +
      `height: ${height} ` +
      `width: ${width}`;
  console.log(settingsStr);
}
Enumerate the available cameras
enumerateCameras() Return a Promise that receives an array of MediaDeviceInfo ie:. {kind, label, deviceId} when the promise is fulfilled. Each object in the array describes one of the available camera (only device-types for which permission has been granted are "available"). The order is significant - the default capture devices will be listed first. If the camera is open, it will only return the promise. If the camera is close, it make sure that camera is granted before returning the promise ie:. do a start/stop cycle of the camera that goes on for 20 ms.
cameraPhoto.enumerateCameras()
  .then((cameras)=>{
    cameras.forEach((camera) => {
      let {kind, label, deviceId} = camera;
      let cameraStr = `
            kind: ${kind}
            label: ${label}
            deviceId: ${deviceId}
        `;
      console.log(cameraStr)
    });
})
plugin - download photo
You can download photo of the dataUri that you took and pass it to downloadPhoto() function.
import { downloadPhoto } from 'jslib-html5-camera-photo';

let dataUri = cameraPhoto.getDataUri(config);
downloadPhoto(dataUri, prefixFileName, number);
// The filename will be saved as the format :
`${prefixFileName}-${number}.jpg|png}`
the parameters of the downloadPhoto() function
| parameters | Description |
|---|---|
| dataUri | Is dataUri of the photo |
| prefixFileName | Is the string prefix of the fileName |
| number | Is the integer number prefix of the fileName with 0 padding |
Stop the camera
Function that stop the camera. If it success, no value is returned. It can fail if they is no camera to stop because the camera has already been stopped or never started. It will give a parameter of Error('no stream to stop!'). Note that each time we start the camera, it internally using this stop function to be able to apply new constraints.
// It stop the camera
cameraPhoto.stopCamera()
  .then(()=>{/* ... */})
  .catch((error)=>{/* ... */});
Full example vanilla Js & HTML
HTML
<!-- needed to by the camera stream -->
<video id="videoId" autoplay="true"></video>

<!-- needed if you want to display the image when you take a photo -->
<img alt="imgId" id="imgId">

<!--buttons to trigger the actions -->
<button id="takePhotoButtonId">takePhoto</button>
<button id="stopCameraButtonId">stopCamera</button>
JavaScript
import CameraPhoto, { FACING_MODES } from 'jslib-html5-camera-photo';

// get video and image elements from the html
let videoElement = document.getElementById('videoId');
let imgElement = document.getElementById('imgId');

// get buttons elements from the html
let takePhotoButtonElement = document.getElementById('takePhotoButtonId');
let stopCameraButtonElement = document.getElementById('stopCameraButtonId');

// instantiate CameraPhoto with the videoElement
let cameraPhoto = new CameraPhoto(videoElement);

/*
 * Start the camera with ideal environment facingMode
 * if the environment facingMode is not available, it will fallback
 * to the default camera available.
 */
cameraPhoto.startCamera(FACING_MODES.ENVIRONMENT)
  .then(() => {
    console.log('Camera started !');
  })
  .catch((error) => {
    console.error('Camera not started!', error);
  });

// function called by the buttons.
function takePhoto () {
  const config = {};
  let dataUri = cameraPhoto.getDataUri(config);
  imgElement.src = dataUri;
}

function stopCamera () {
  cameraPhoto.stopCamera()
    .then(() => {
      console.log('Camera stoped!');
    })
    .catch((error) => {
      console.log('No camera to stop!:', error);
    });
}

// bind the buttons to the right functions.
takePhotoButtonElement.onclick = takePhoto;
stopCameraButtonElement.onclick = stopCamera;
Full example with React
A project with react is build with this library react-html5-camera-photo
import React from 'react';
import CameraPhoto, { FACING_MODES } from 'jslib-html5-camera-photo';

class App extends React.Component {
  constructor (props, context) {
    super(props, context);
    this.cameraPhoto = null;
    this.videoRef = React.createRef();
    this.state = {
      dataUri: ''
    }
  }

  componentDidMount () {
    // We need to instantiate CameraPhoto inside componentDidMount because we
    // need the refs.video to get the videoElement so the component has to be
    // mounted.
    this.cameraPhoto = new CameraPhoto(this.videoRef.current);
  }

  startCamera (idealFacingMode, idealResolution) {
    this.cameraPhoto.startCamera(idealFacingMode, idealResolution)
      .then(() => {
        console.log('camera is started !');
      })
      .catch((error) => {
        console.error('Camera not started!', error);
      });
  }

  startCameraMaxResolution (idealFacingMode) {
    this.cameraPhoto.startCameraMaxResolution(idealFacingMode)
      .then(() => {
        console.log('camera is started !');
      })
      .catch((error) => {
        console.error('Camera not started!', error);
      });
  }

  takePhoto () {
    const config = {
      sizeFactor: 1
    };

    let dataUri = this.cameraPhoto.getDataUri(config);
    this.setState({ dataUri });
  }

  stopCamera () {
    this.cameraPhoto.stopCamera()
      .then(() => {
        console.log('Camera stoped!');
      })
      .catch((error) => {
        console.log('No camera to stop!:', error);
      });
  }

  render () {
    return (
      <div>
        <button onClick={ () => {
          let facingMode = FACING_MODES.ENVIRONMENT;
          let idealResolution = { width: 640, height: 480 };
          this.startCamera(facingMode, idealResolution);
        }}> Start environment facingMode resolution ideal 640 by 480 </button>

        <button onClick={ () => {
          let facingMode = FACING_MODES.USER;
          this.startCamera(facingMode, {});
        }}> Start user facingMode resolution default </button>

        <button onClick={ () => {
          let facingMode = FACING_MODES.USER;
          this.startCameraMaxResolution(facingMode);
        }}> Start user facingMode resolution maximum </button>

        <button onClick={ () => {
          this.takePhoto();
        }}> Take photo </button>

        <button onClick={ () => {
          this.stopCamera();
        }}> Stop </button>

        <video
          ref={this.videoRef}
          autoPlay="true"
        />
        <img
          alt="imgCamera"
          src={this.state.dataUri}
        />
      </div>
    );
  }
}

export default App;
import the UMD module with HTML script tag
You can build the dist and then serve it with :
$ npm run buildBrowser
$ npm run serve:dist
Or you can copy the dist folder of the repo.
Example :
<script src="/jslib-html5-camera-photo.min.js"></script>
<script>
  ...
  var FACING_MODES = JslibHtml5CameraPhoto.FACING_MODES;
  var cameraPhoto = new JslibHtml5CameraPhoto.default(videoElement);
  ...
</script
Development
I choose the env dev of create-react-app even if it is vanilla js library because it's simple to use and really efficient to develop but you don't necessarily need react to use it. If you want to fix bug or add functionalities please contribute :)