Plop
Micro-generator framework that makes it easy for an entire team to create files with a level of uniformity.

Documentation also available on plopjs.com
Getting Started


What is Plop?
Plop is what I like to call a "micro-generator framework." Now, I call it that because it is a small tool that gives you a simple way to generate code or any other type of flat text files in a consistent way. You see, we all create structures and patterns in our code (routes, controllers, components, helpers, etc). These patterns change and improve over time so when you need to create a NEW insert-name-of-pattern-here, it's not always easy to locate the files in your codebase that represent the current "best practice." That's where plop saves you. With plop, you have your "best practice" method of creating any given pattern in CODE. Code that can easily be run from the terminal by typing plop. Not only does this save you from hunting around in your codebase for the right files to copy, but it also turns "the right way" into "the easiest way" to make new files.
If you boil plop down to its core, it is basically glue code between inquirer prompts and handlebar templates.
This documentation is a work in progress. If you have great ideas, I'd love to hear them.
Installation
1. Add plop to your project
$ npm install --save-dev plop
2. Install plop globally (optional, but recommended for easy access)
$ npm install -g plop
3. Create a plopfile.js at the root of your project
export default function (plop) {
  // create your generators here
  plop.setGenerator("basics", {
    description: "this is a skeleton plopfile",
    prompts: [], // array of inquirer prompts
    actions: [], // array of actions
  });
}
export default is only allowed in NodeJS inside "ESM" supported files.
To use this syntax, your plopfile must be either:
- An ESM .js file with type: "module" in package.json
- An ESM .mjs file with any type declared in package.json
Alternatively, you can have a plopfile with module.exports = function (plop) instead.
For this syntax, your plopfile must be either:
- A CommonJS .js file with type: "commonjs" in package.json
- A CommonJS .cjs file with any type declared in package.json
Your First Plopfile
A plopfile starts its life as a node module that exports a function which accepts the plop object as its first parameter.
export default function (plop) {}
The plop object exposes the plop API object which contains the setGenerator(name, config) function. This is the function that you use to (wait for it) create a generator for this plopfile. When plop is run from the terminal in this directory (or any sub-directory), a list of these generators will be displayed.
Let's try setting up a basic generator to see how that looks.
export default function (plop) {
  // controller generator
  plop.setGenerator("controller", {
    description: "application controller logic",
    prompts: [
      {
        type: "input",
        name: "name",
        message: "controller name please",
      },
    ],
    actions: [
      {
        type: "add",
        path: "src/{{name}}.js",
        templateFile: "plop-templates/controller.hbs",
      },
    ],
  });
}
The controller generator we created above will ask us 1 question, and create 1 file. This can be expanded to ask as many questions as needed, and create as many files as needed. There are also additional actions that can be used to alter our codebase in different ways.
Using Prompts
Plop uses the inquirer.js library to gather user data. A list of prompt types can be found on the inquirer official website.
CLI Usage
Once plop is installed, and you have created a generator, you are ready to run plop from the terminal. Running plop with no parameters will present you with a list of generators to pick from. You can also run plop [generatorName] to trigger a generator directly. If you did not install plop globally, you will need to setup an npm script to run plop for you.
// package.json
{
    ...,
    "scripts": {
        "plop": "plop"
    },
    ...
}
Bypassing Prompts
Once you get to know a project (and its generators) well, you may want to provide answers to the prompts when you run the generator. If I have (for instance) a component generator that has one prompt (name), I can run that generator using plop component "some component name" and it will immediately execute as though I had typed "some component name" into the prompt. If that same generator had a second prompt, the same input would have resulted in the user being prompted for the second value.
Prompts like confirm and list try to make sense of your input as best they can. For instance entering "y", "yes", "t", or "true" for a confirm prompt will result in a boolean true value. You can select items from a list using their value, index, key, or name. Checkbox prompts can accept a comma separated list of values in order to select multiples.
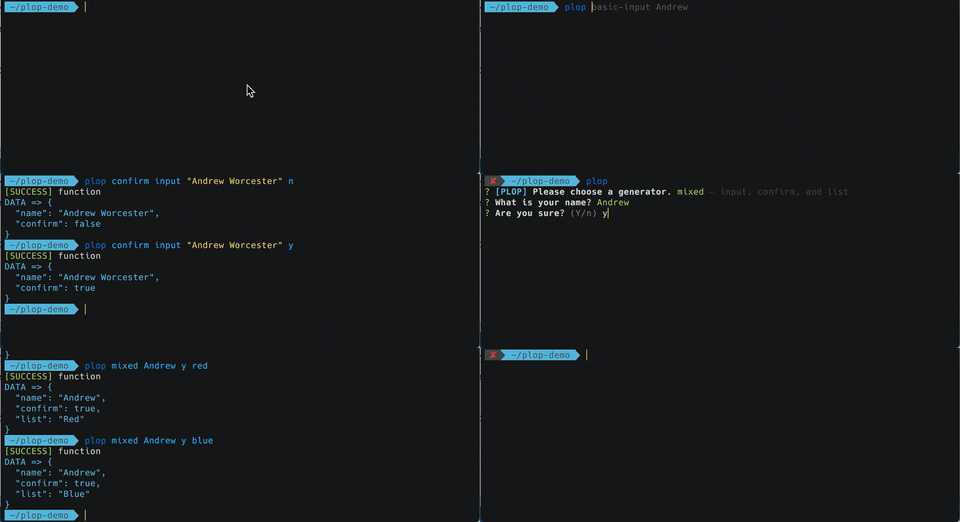
If you want to provide bypass input for the second prompt but not the first, you can use an underscore "_" to skip the bypass (ie plop component _ "input for second prompt").
Plop comes with bypass logic built-in for standard inquirer prompts, but there are also ways to provide custom logic for how to handle user input for a specific prompt.
If you have published a 3rd party inquirer prompt plugin and would like to support bypass functionality for plop users out of the box, that is covered in another section of this documentation.
Bypassing Prompts (by Name)
You can also bypass prompts by name using -- and then providing arguments for each prompt that you'd like to bypass. Examples below.
Bypass Examples
## Bypassing both prompt 1 and 2
$ plop component "my component" react
$ plop component -- --name "my component" --type react

## Bypassing only prompt 2 (will be prompted for name)
$ plop component _ react
$ plop component -- --type react
Running a Generator Forcefully
By default Plop actions keep your files safe by failing when things look fishy. The most obvious example of this is not allowing an add action to overwrite a file that already exists. Plop actions individually support the force property but you can also use the --force flag when running Plop from the terminal. Using the --force flag will tell every action to run forcefully. With great power...🕷
Using TypeScript plopfiles
Node.js v22.18+**
Modern Node.js supports TypeScript files out-of-the-box. No extra setup or CLI flags are required to use a TypeScript plopfile.
First, make a TypesScript plopfile using plop --init-ts or by hand:
// plopfile.ts
import { NodePlopAPI } from "plop";

export default function (plop: NodePlopAPI) {
  // plop generator code
}
Second, add plop to scripts in package.json:
// package.json
"scripts": {
  "plop" : "plop"
}
Older Node.js Versions**
Plop bundles TypeScript declarations and supports TypeScript plopfiles via tsx loaders, a feature of NodeJS command line imports.
First, make a TypesScript plopfile using plop --init-ts or by hand:
// plopfile.ts
import { NodePlopAPI } from "plop";

export default function (plop: NodePlopAPI) {
  // plop generator code
}
Next, install tsx and optionally cross-env:
npm i -D tsx cross-env
Finally, use NODE_OPTIONS to activate the tsx loader. Now Plop can import your plopfile.ts:
Node.js v20.6 and above
// package.json
"scripts": {
  "plop" : "cross-env NODE_OPTIONS='--import tsx' plop --plopfile=plopfile.ts"
}
Node.js v20.5.1 and below
// package.json
"scripts": {
  "plop": "cross-env NODE_OPTIONS='--loader tsx' plop --plopfile=plopfile.ts"
}
Why Generators?
Because when you create your boilerplate separate from your code, you naturally put more time and thought into it.
Because saving your team (or yourself) 5-15 minutes when creating every route, component, controller, helper, test, view, etc... really adds up.
Because context switching is expensive and saving time is not the only benefit to automating workflows
Plopfile API
The plopfile api is the collection of methods that are exposed by the plop object. Most of the work is done by setGenerator but this section documents the other methods that you may also find useful in your plopfile.
TypeScript Support
Plop bundles TypeScript declarations. See using TypeScript plopfiles for more details.
JSDoc Support
Whether or not you write your plopfile in TypeScript, many editors will offer code assistance via JSDoc declarations.
// plopfile.js
export default function (
  /** @type {import('plop').NodePlopAPI} */
  plop,
) {
  // plop generator code
}
Main Methods
These are the methods you will commonly use when creating a plopfile. Other methods that are mostly for internal use are list in the other methods section.
setHelper
setHelper directly corresponds to the handlebars method registerHelper. So if you are familiar with handlebars helpers, then you already know how this works.
export default function (plop) {
  plop.setHelper("upperCase", function (text) {
    return text.toUpperCase();
  });

  // or in es6/es2015
  plop.setHelper("upperCase", (txt) => txt.toUpperCase());
}
setPartial
setPartial directly corresponds to the handlebars method registerPartial. So if you are familiar with handlebars partials, then you already know how this works.
export default function (plop) {
  plop.setPartial("myTitlePartial", "<h1>{{titleCase name}}</h1>");
  // used in template as {{> myTitlePartial }}
}
setActionType
setActionType allows you to create your own actions (similar to add or modify) that can be used in your plopfiles. These are basically highly reusable custom action functions.
FunctionSignature Custom Action
| Parameters | Type | Description |
|---|
| answers | Object | Answers to the generator prompts |
| config | ActionConfig | The object in the "actions" array for the generator |
| plop | PlopfileApi | The plop api for the plopfile where this action is being run |
export default function (plop) {
  plop.setActionType("doTheThing", function (answers, config, plop) {
    // do something
    doSomething(config.configProp);
    // if something went wrong
    throw "error message";
    // otherwise
    return "success status message";
  });

  // or do async things inside of an action
  plop.setActionType("doTheAsyncThing", function (answers, config, plop) {
    // do something
    return new Promise((resolve, reject) => {
      if (success) {
        resolve("success status message");
      } else {
        reject("error message");
      }
    });
  });

  // use the custom action
  plop.setGenerator("test", {
    prompts: [],
    actions: [
      {
        type: "doTheThing",
        configProp: "available from the config param",
      },
      {
        type: "doTheAsyncThing",
        speed: "slow",
      },
    ],
  });
}
setPrompt
Inquirer provides many types of prompts out of the box, but it also allows developers to build prompt plugins. If you'd like to use a prompt plugin, you can register it with setPrompt. For more details see the Inquirer documentation for registering prompts. Also check out the plop community driven list of custom prompts.
import autocompletePrompt from 'inquirer-autocomplete-prompt';
export default function (plop) {
	plop.setPrompt('autocomplete', autocompletePrompt);
	plop.setGenerator('test', {
		prompts: [{
			type: 'autocomplete',
			...
		}]
	});
};
setGenerator
The config object needs to include prompts and actions (description is optional). The prompts array is passed to inquirer. The actions array is a list of actions to take (described in greater detail below)
Interface GeneratorConfig
| Property | Type | Default | Description |
|---|
| description | [String] | | short description of what this generator does |
| prompts | Array[InquirerQuestion] | | questions to ask the user |
| actions | Array[ActionConfig] | | actions to perform |
If your list of actions needs to be dynamic, take a look at using a dynamic actions array.
Interface PlopGenerator
| Property | Type | Default | Description |
|---|
| runPrompts | Function | | a function to run the prompts within a generator |
| runActions | Function | | a function to run the actions within a generator |
This interface also contains all properties from GeneratorConfig
Interface ActionConfig
The following properties are the standard properties that plop handles internally. Other properties will be required depending on the type of action. Also take a look at the built-in actions.
| Property | Type | Default | Description |
|---|
| type | String | | the type of action (add, modify, addMany, etc) |
| force | Boolean | false | performs the action forcefully (means different things depending on the action) |
| data | Object / Function | {} | specifies data that should be mixed with user prompt answers when running this action |
| abortOnFail | Boolean | true | if this action fails for any reason abort all future actions |
| skip | Function | | an optional function that specifies if the action should run |
The data property on any ActionConfig can also be a Function that returns an Object or a Function that returns a Promise that resolves with an Object.
The skip function on any ActionConfig is optional and should return a string if the action should be skipped. The return value is the reason to skip the action.
Instead of an Action Object, a function can also be used
Other Methods
| Method | Parameters | Returns | Description |
|---|
| getHelper | String | Function | get the helper function |
| getHelperList | | Array[String] | get a list of helper names |
| getPartial | String | String | get a handlebars partial by name |
| getPartialList | | Array[String] | get a list of partial names |
| getActionType | String | CustomAction | get an actionType by name |
| getActionTypeList | | Array[String] | get a list of actionType names |
| setWelcomeMessage | String | | Customizes the displayed message that asks you to choose a generator when you run plop. |
| getGenerator | String | GeneratorConfig | get the PlopGenerator by name |
| getGeneratorList | | Array[Object] | gets an array of generator names and descriptions |
| setPlopfilePath | String | | set the plopfilePath value which is used internally to locate resources like template files |
| getPlopfilePath | | String | returns the absolute path to the plopfile in use |
| getDestBasePath | | String | returns the base path that is used when creating files |
| setDefaultInclude | Object | Object | sets the default config that will be used for this plopfile if it is consumed by another plopfile using plop.load() |
| getDefaultInclude | String | Object | gets the default config that will be used for this plopfile if it is consumed by another plopfile using plop.load() |
| renderString | String, Object | String | Runs the first parameter (String) through the handlebars template renderer using the second parameter (Object) as the data. Returns the rendered template. |
Built-In Actions
There are several types of built-in actions you can use in your GeneratorConfig. You specify which type of action (all paths are based on the location of the plopfile), and a template to use.
The Add, AddMany and Modify actions have an optional transform method that can be used to transform the template result before it is written to disk. The transform function receives the template result or file contents as a string and the action data as arguments. It must return a string or a Promise that resolves to a string.
Add
The add action is used to (you guessed it) add a file to your project. The path property is a handlebars template that will be used to create the file by name. The file contents will be determined by the template or templateFile property.
| Property | Type | Default | Description |
|---|
| path | String | | a handlebars template that (when rendered) is the path of the new file |
| template | String | | a handlebars template that should be used to build the new file |
| templateFile | String | | a path a file containing the template |
| skipIfExists | Boolean | false | skips a file if it already exists (instead of failing) |
| transform | Function | | an optional function that can be used to transform the template result before writing the file to disk |
| skip | Function | | inherited from ActionConfig |
| force | Boolean | false | inherited from ActionConfig (overwrites files if they exist) |
| data | Object | {} | inherited from ActionConfig |
| abortOnFail | Boolean | true | inherited from ActionConfig |
AddMany
The addMany action can be used to add multiple files to your project with a single action. The destination property is a handlebars template that will be used to identify the folder that the generated files should go into. The base property can be used to alter what section of the template paths should be omitted when creating files. The paths located by the templateFiles glob can use handlebars syntax in their file/folder names if you'd like the added file names to be unique (example: {{ dashCase name }}.spec.js).
| Property | Type | Default | Description |
|---|
| destination | String | | a handlebars template that (when rendered) is the destination folder for the new files |
| base | String | | the section of the path that should be excluded when adding files to the destination folder |
| templateFiles | Glob | | glob pattern that matches multiple template files to be added |
| stripExtensions | [String] | ['hbs'] | file extensions that should be stripped from templateFiles files names while being added to the destination |
| globOptions | Object | | glob options that change how to match to the template files to be added |
| verbose | Boolean | true | print each successfully added file path |
| transform | Function | | an optional function that can be used to transform the template result before writing each file to disk |
| skip | Function | | inherited from ActionConfig |
| skipIfExists | Boolean | false | inherited from Add (skips a file if it already exists) |
| force | Boolean | false | inherited from ActionConfig (overwrites files if they exist) |
| data | Object | {} | inherited from ActionConfig |
| abortOnFail | Boolean | true | inherited from ActionConfig |
Modify
The modify action can be used two ways. You can use a pattern property to find/replace text in the file located at the path specified, or you can use a transform function to transform the file contents. Both pattern and transform can be used at the same time (transform will happen last). More details on modify can be found in the example folder.
| Property | Type | Default | Description |
|---|
| path | String | | handlebars template that (when rendered) is the path of the file to be modified |
| pattern | RegExp | end‑of‑file | regular expression used to match text that should be replaced |
| template | String | | handlebars template that should replace what was matched by the pattern. capture groups are available as $1, $2, etc |
| templateFile | String | | path a file containing the template |
| transform | Function | | an optional function that can be used to transform the file before writing it to disk |
| skip | Function | | inherited from ActionConfig |
| data | Object | {} | inherited from ActionConfig |
| abortOnFail | Boolean | true | inherited from ActionConfig |
Append
The append action is a commonly used subset of modify. It is used to append data in a file at a particular location.
| Property | Type | Default | Description |
|---|
| path | String | | handlebars template that (when rendered) is the path of the file to be modified |
| pattern | RegExp, String | | regular expression used to match text where the append should happen |
| unique | Boolean | true | whether identical entries should be removed |
| separator | String | new line | the value that separates entries |
| template | String | | handlebars template to be used for the entry |
| templateFile | String | | path a file containing the template |
| data | Object | {} | inherited from ActionConfig |
| abortOnFail | Boolean | true | inherited from ActionConfig |
Custom (Action Function)
The Add and Modify actions will take care of almost every case that plop is designed to handle. However, plop does offer custom action functions for the node/js guru. A custom action function is a function that is provided in the actions array.
- Custom action functions are executed by plop with the same CustomAction function signature.
- Plop will wait for the custom action to complete before executing the next action.
- The function must let plop known what’s happening through the return value. If you return a
Promise, we won’t start other actions until the promise resolves. If you return a message (String), we know that the action is done and we’ll report the message in the status of the action.
- A custom action fails if the promise is rejected, or the function throws an
Exception
See the example plopfile for a sample synchronous custom action.
Comments
Comment lines can be added to the actions array by adding a string in place of an action config object. Comments are printed to the screen when plop comes to them and have no functionality of their own.
Built-In Helpers
There are a few helpers that I have found useful enough to include with plop. They are mostly case modifiers, but here is the complete list.
Case Modifiers
- camelCase: changeFormatToThis
- snakeCase: change_format_to_this
- dashCase/kebabCase: change-format-to-this
- dotCase: change.format.to.this
- pathCase: change/format/to/this
- properCase/pascalCase: ChangeFormatToThis
- lowerCase: change format to this
- sentenceCase: Change format to this,
- constantCase: CHANGE_FORMAT_TO_THIS
- titleCase: Change Format To This
Other Helpers
- pkg: look up a property from a package.json file in the same folder as the plopfile.
Taking it Further
There is not a lot needed to get up and running on some basic generators. However, if you want to take your plop-fu further, read on young padawan.
Using a Dynamic Actions Array
Alternatively, the actions property of the GeneratorConfig can itself be a function that takes the answers data as a parameter and returns the actions array.
This allows you to adapt the actions array based on provided answers:
export default function (plop) {
  plop.setGenerator("test", {
    prompts: [
      {
        type: "confirm",
        name: "wantTacos",
        message: "Do you want tacos?",
      },
    ],
    actions: function (data) {
      var actions = [];

      if (data.wantTacos) {
        actions.push({
          type: "add",
          path: "folder/{{dashCase name}}.txt",
          templateFile: "templates/tacos.txt",
        });
      } else {
        actions.push({
          type: "add",
          path: "folder/{{dashCase name}}.txt",
          templateFile: "templates/burritos.txt",
        });
      }

      return actions;
    },
  });
}
3rd Party Prompt Bypass
If you have written an inquirer prompt plugin and want to support plop's bypass functionality, the process is pretty simple. The plugin object that your prompt exports should have a bypass function. This bypass function will be run by plop with the user's input as the first parameter and the prompt config object as the second parameter. The value that this function returns will be added to the answer data object for that prompt.
// My confirmation inquirer plugin
export default MyConfirmPluginConstructor;
function MyConfirmPluginConstructor() {
  // ...your main plugin code
  this.bypass = (rawValue, promptConfig) => {
    const lowerVal = rawValue.toString().toLowerCase();
    const trueValues = ["t", "true", "y", "yes"];
    const falseValues = ["f", "false", "n", "no"];
    if (trueValues.includes(lowerVal)) return true;
    if (falseValues.includes(lowerVal)) return false;
    throw Error(`"${rawValue}" is not a valid ${promptConfig.type} value`);
  };
  return this;
}
For the above example, the bypass function takes the user's text input and turns it into a Boolean value that will be used as the prompt answer data.
Adding Bypass Support to Your Plopfile
If the 3rd party prompt plugin you are using does not support bypass by default, you can add the bypass function above to your prompt's config object and plop will use it for handling bypass data for that prompt.
Wrapping Plop
Plop provides a lot of powerful functionality "for free". This utility is so powerful, in fact, that you can even wrap plop
into your own CLI project. To do so, you only need a plopfile.js, a package.json, and a template to reference.
Your index.js file should look like the following:
#!/usr/bin/env node
import path from "node:path";
import minimist from "minimist";
import { Plop, run } from "plop";

const args = process.argv.slice(2);
const argv = minimist(args);

import { dirname } from "node:path";
import { fileURLToPath } from "node:url";

const __dirname = dirname(fileURLToPath(import.meta.url));

Plop.prepare(
  {
    cwd: argv.cwd,
    configPath: path.join(__dirname, "plopfile.js"),
    preload: argv.preload || [],
    completion: argv.completion,
  },
  (env) => Plop.execute(env, run),
);
And your package.json should look like the following:
{
  "name": "create-your-name-app",
  "version": "1.0.0",
  "main": "index.js",
  "scripts": {
    "start": "plop"
  },
  "bin": {
    "create-your-name-app": "./index.js"
  },
  "preferGlobal": true,
  "dependencies": {
    "plop": "^3.0.0"
  }
}
Setting the base destination path for the wrapper
When wrapping plop, you might want to have the destination path to be based on the cwd when running the wrapper. You can configure the dest base path like this:
Plop.prepare(
  {
    // config like above
  },
  (env) =>
    Plop.execute(env, (env) => {
      const options = {
        ...env,
        dest: process.cwd(), // this will make the destination path to be based on the cwd when calling the wrapper
      };
      return run(options, undefined, true);
    }),
);
Adding General CLI Actions
Many CLI utilities handle some actions for you, such as running git init or npm install once the template is generated.
While we'd like to provide these actions, we also want to keep the core actions limited in scope. As such, we maintain a collection of libraries built to add these actions to Plop in our Awesome Plop list. There, you'll be able to find options for those actions, or even build your own and add it to the list!
Further Customization
While plop provides a great level of customization for CLI utility wrappers, there may be usecases where you simply
want more control over the CLI experience while also utilizing the template generation code.
Luckily, node-plop may be for you! It's what the plop CLI itself is built
upon and can be easily extended for other usage in the CLI. However, be warned, documentation is not quite as fleshed out
for integration with node-plop. That is to say Thar be dragons.
We note lackluster documentation on node-plop integration not as a point of pride, but rather a word of warning.
If you'd like to contribute documentation to the project, please do so! We always welcome and encourage contributions!

