datadog-metrics
Buffered metrics reporting via the Datadog HTTP API.


Datadog-metrics lets you collect application metrics through Datadog's HTTP API. Using the HTTP API has the benefit that you don't need to install the Datadog Agent (StatsD). Just get an API key, install the module and you're ready to go.
The downside of using the HTTP API is that it can negatively affect your app's performance. Datadog-metrics solves this issue by buffering metrics locally and periodically flushing them to Datadog.
Installation
Datadog-metrics is compatible with Node.js v12 and later. You can install it with NPM:
npm install datadog-metrics --save
Example
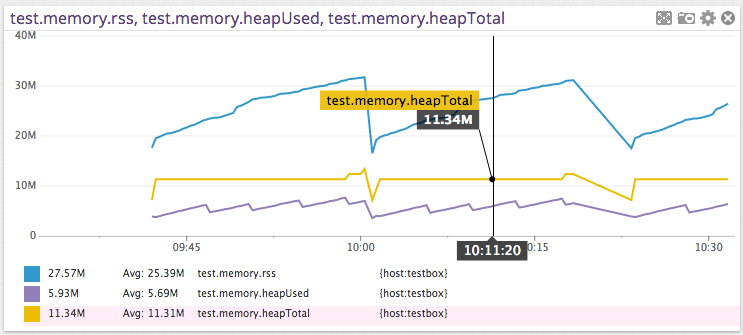
Save the following into a file named example_app.js:
var metrics = require('datadog-metrics');
metrics.init({ host: 'myhost', prefix: 'myapp.' });

function collectMemoryStats() {
    var memUsage = process.memoryUsage();
    metrics.gauge('memory.rss', memUsage.rss);
    metrics.gauge('memory.heapTotal', memUsage.heapTotal);
    metrics.gauge('memory.heapUsed', memUsage.heapUsed);
};

setInterval(collectMemoryStats, 5000);
Run it:
DATADOG_API_KEY=YOUR_KEY DEBUG=metrics node example_app.js
Tutorial
There's also a longer tutorial that walks you through setting up a monitoring dashboard on Datadog using datadog-metrics.
Usage
Datadog API key
Make sure the DATADOG_API_KEY or DD_API_KEY environment variable is set to your Datadog API key (you can also set it via the apiKey option in code). You can find the API key under Integrations > APIs. Please note the API key is different from an application key. For more details, see Datadog’s “API and Application Keys” docs.
Module setup
There are three ways to use this module to instrument an application.
They differ in the level of control that they provide.
Use case #1: Just let me track some metrics already!
Just require datadog-metrics and you're ready to go. After that you can call
gauge, increment and histogram to start reporting metrics.
var metrics = require('datadog-metrics');
metrics.gauge('mygauge', 42);
Use case #2: I want some control over this thing!
If you want more control you can configure the module with a call to init.
Make sure you call this before you use the gauge, increment and histogram
functions. See the documentation for init below to learn more.
var metrics = require('datadog-metrics');
metrics.init({ host: 'myhost', prefix: 'myapp.' });
metrics.gauge('mygauge', 42);
Use case #3: Must. Control. Everything.
If you need even more control you can create one or more BufferedMetricsLogger instances and manage them yourself:
var metrics = require('datadog-metrics');
var metricsLogger = new metrics.BufferedMetricsLogger({
    site: 'datadoghq.eu',
    apiKey: 'TESTKEY',
    host: 'myhost',
    prefix: 'myapp.',
    flushIntervalSeconds: 15,
    defaultTags: ['env:staging', 'region:us-east-1'],
    onError (error) {
        console.error('There was an error auto-flushing metrics:', error);
    }
});
metricsLogger.gauge('mygauge', 42);
API
Initialization
metrics.init(options)
Where options is an object and can contain the following:
-
host: Sets the hostname reported with each metric. (optional)
- Setting a hostname is useful when you're running the same application
on multiple machines and you want to track them separately in Datadog.
-
prefix: Sets a default prefix for all metrics. (optional)
- Use this to namespace your metrics.
-
flushIntervalSeconds: How often to send metrics to Datadog. (optional)
- This defaults to 15 seconds. Set it to
0 to disable auto-flushing (which
means you must call flush() manually).
-
site: Sets the Datadog "site", or server where metrics are sent. (optional)
-
apiKey: Sets the Datadog API key. (optional)
- It's usually best to keep this in an environment variable.
Datadog-metrics looks for the API key in the
DATADOG_API_KEY or
DD_API_KEY environment variable by default.
- You must either set this option or the environment variable. An API key
is required to send metrics.
- Make sure not to confuse this with your application key! For more
details, see: https://docs.datadoghq.com/account_management/api-app-keys/
- Ignored if you set the
reporter option.
-
appKey: ⚠️ Deprecated. This does nothing and will be removed in an upcoming
release.
Sets the Datadog application key. This is not actually needed for sending
metrics or distributions, and you probably shouldn’t set it. Do not confuse
this with your API key! For more, see:
https://docs.datadoghq.com/account_management/api-app-keys/
-
defaultTags: Default tags used for all metric reporting. (optional)
- Set tags that are common to all metrics.
-
onError: A function to call when there are asynchronous errors seding
buffered metrics to Datadog. It takes one argument (the error). (optional)
- If this option is not set, the error will be logged to stderr.
-
histogram: An object with default options for all histograms. This has the
same properties as the options object on the histogram() method. Options
specified when calling the method are layered on top of this object.
(optional)
-
retries: How many times to retry failed metric submissions to Datadog’s API.
- Defaults to
2.
- Ignored if you set the
reporter option.
-
retryBackoff: How long to wait before retrying a failed Datadog API call.
Subsequent retries multiply this delay by 2^(retry count). For example, if
this is set to 1, retries will happen after 1, then 2, then 4 seconds.
- Defaults to
1.
- Ignored if you set the
reporter option.
-
reporter: An object that actually sends the buffered metrics. (optional)
- There are two built-in reporters you can use:
reporters.DatadogReporter sends metrics to Datadog’s API, and is
the default.reporters.NullReporter throws the metrics away. It’s useful for
tests or temporarily disabling your metrics.
Example:
metrics.init({ host: 'myhost', prefix: 'myapp.' });
Disabling metrics using NullReporter:
metrics.init({ host: 'myhost', reporter: metrics.NullReporter() });
Send metrics to a totally different service instead of Datadog:
metrics.init({
  reporter: {
    async report(series) {
      // `series` is an array of metrics objects, formatted basically how the
      // Datadog v1 metrics API and v1 distributions API want them.
      const response = await fetch('https://my-datadog-like-api.com/series', {
        method: 'POST',
        body: JSON.stringify({ series })
      });
      return await response.json();
    }
  }
});
Gauges
metrics.gauge(key, value[, tags[, timestamp]])
Record the current value of a metric. The most recent value since the last
flush will be recorded. Optionally, specify a set of tags to associate with the
metric. This should be used for sum values such as total hard disk space,
process uptime, total number of active users, or number of rows in a database
table. The optional timestamp is in milliseconds since 1 Jan 1970 00:00:00 UTC,
e.g. from Date.now().
Example:
metrics.gauge('test.mem_free', 23);
Counters
metrics.increment(key[, value[, tags[, timestamp]]])
Increment the counter by the given value (or 1 by default). Optionally,
specify a list of tags to associate with the metric. This is useful for
counting things such as incrementing a counter each time a page is requested.
The optional timestamp is in milliseconds since 1 Jan 1970 00:00:00 UTC,
e.g. from Date.now().
Example:
metrics.increment('test.requests_served');
metrics.increment('test.awesomeness_factor', 10);
Histograms
metrics.histogram(key, value[, tags[, timestamp[, options]]])
Sample a histogram value. Histograms will produce metrics that
describe the distribution of the recorded values, namely the minimum,
maximum, average, median, count and the 75th, 85th, 95th and 99th percentiles.
Optionally, specify a list of tags to associate with the metric.
The optional timestamp is in milliseconds since 1 Jan 1970 00:00:00 UTC,
e.g. from Date.now().
Example:
metrics.histogram('test.service_time', 0.248);
You can also specify an options object to adjust which aggregations and
percentiles should be calculated. For example, to only calculate an average,
count, and 99th percentile:
metrics.histogram('test.service_time', 0.248, ['tag:value'], Date.now(), {
    // Aggregates can include 'max', 'min', 'sum', 'avg', 'median', or 'count'.
    aggregates: ['avg', 'count'],
    // Percentiles can include any decimal between 0 and 1.
    percentiles: [0.99]
});
Distributions
metrics.distribution(key, value[, tags[, timestamp]])
Send a distribution value. Distributions are similar to histograms (they create
several metrics for count, average, percentiles, etc.), but they are calculated
server-side on Datadog’s systems. This is much higher-overhead than histograms,
and the individual calculations made from it have to be configured on the
Datadog website instead of in the options for this package.
You should use this in environments where you have many instances of your
application running in parallel, or instances constantly starting and stopping
with different hostnames or identifiers and tagging each one separately is not
feasible. AWS Lambda or serverless functions are a great example of this. In
such environments, you also might want to use a distribution instead of
increment or gauge (if you have two instances of your app sending those
metrics at the same second, and they are not tagged differently or have
different host names, one will overwrite the other — distributions will not).
Example:
metrics.distribution('test.service_time', 0.248);
Flushing
By default, datadog-metrics will automatically flush, or send accumulated
metrics to Datadog, at regular intervals, and, in environments that support it,
before your program exits. (However, if you call process.exit() to cause a
hard exit, datadog-metrics doesn’t get a chance to flush. In this case, you may
want to call await metrics.stop() first.)
You can adjust the interval by using the flushIntervalSeconds option. Setting
it to 0 will disable auto-flushing entirely:
// Set auto-flush interval to 10 seconds.
metrics.init({ flushIntervalSeconds: 10 });
You can also send accumulated metrics manually at any time by calling
metrics.flush().
Please note that, when calling the BufferedMetricsLogger constructor directly,
flushIntervalSeconds defaults to 0 instead. When constructing your own
logger this way, you must expicitly opt-in to auto-flushing by setting a
positive value.
metrics.flush()
Sends any buffered metrics to Datadog and returns a promise. By default,
flush() will be called for you automatically unless you set
flushIntervalSeconds to 0 (see above for more details).
⚠️ This method used to take two callback arguments for handling successes and
errors. That form is deprecated and will be removed in a future update:
// Deprecated:
metrics.flush(
    () => console.log('Flush suceeded!'),
    (error) => console.log('Flush error:', error)
);

// Current, using `await`:
try {
    await metrics.flush();
    console.log('Flush suceeded!');
} catch (error) {
    console.log('Flush error:', error);
}

// Or, using Promise callbacks:
metrics.flush()
    .then(() => console.log('Flush succeeded'))
    .catch((error) => console.log('Flush error:', error)) ;
metrics.stop(options)
Stops auto-flushing (if enabled) and flushes any currently buffered metrics.
This is mainly useful if you want to manually clean up and send remaining
metrics before hard-quitting your program (usually by calling process.exit()).
Returns a promise for the result of the flush.
Takes an optional object with properties:
flush (boolean) Whether to flush any remaining metrics after stopping.
Defaults to true.
Logging
Datadog-metrics uses the debug
library for logging at runtime. You can enable debug logging by setting
the DEBUG environment variable when you run your app.
Example:
DEBUG=metrics node app.js
Contributing
Contributions are always welcome! For more info on how to contribute or develop locally, please see CONTRIBUTING.md.
Release History
0.12.1 (2024-12-18)
New Features:
-
When auto-flushing is enabled, metrics are now also flushed before the process exits. In previous versions, you needed to do this manually by calling metrics.flush() at the every end of your program. (#141)
You will still need to flush manually if you set flushIntervalSeconds to 0 or stop() (see below) if you are quitting your program by calling process.exit() (which interrupts a variety of operations).
-
A new stop() method disables auto-flushing and flushes any currently buffered metrics (you can leave metrics in the buffer instead with the flush option: stop({flush: false})). (#141)
View diff
0.12.0 (2024-12-05)
Datadog-metrics now automatically retries failed metric submissions and uses promises for asynchronous actions! There are a handful of other deprecations and small improvements.
Breaking Changes:
- The
DatadogReporter constructor now takes an options object instead of positional arguments. Using this constructor directly is pretty rare, so this won’t affect most users. (#138)
New Features:
-
Promises: asynchronous actions now use promises instead of callbacks. Callbacks are deprecated, but still work — they’ll be fully removed in v0.13.0. This affects:
- The
flush() method now returns a promise.
- The
report(series) method on any custom reporters should now return a promise. For now, datadog-metrics will use the old callback-based behavior if the method signature has callbacks listed after series argument.
(See #125)
-
Retries: flushes to Datadog’s API are now retried automatically. This can help you work around intermittent network issues or rate limits. To adjust retries, use the retries and retryBackoff options.
metrics.init({
    // How many times to retry. To disable retries, set this to 0.
    retries: 2,
    // How long (in seconds) to wait between retries. Subsequent retries
    // wait exponentially longer.
    retryBackoff: 1
});
(See #138)
-
Environment variables: you can now use either DATADOG_ or DD_ prefixes for environment variables (previously, only DATADOG_ worked). For example, you can set your API key via DATADOG_API_KEY or DD_API_KEY. (#137)
Deprecations:
-
The appKey option is no longer supported. Application keys (as opposed to API keys) are not actually needed for sending metrics or distributions to the Datadog API. Including it in your configuration adds no benefits, but risks exposing a sensitive credential. (#127)
-
The DATADOG_API_HOST environment variable is now deprecated. Please use DATADOG_SITE or DD_SITE instead (the apiHost option was renamed to site in v0.11.0, but the DATADOG_API_HOST environment variable was accidentally left as-is). (#134)
View diff
0.11.4 (2024-11-10)
This release updates the TypeScript types for this project, and doesn’t include any changes to functionality. There are also no changes since v0.11.4-a.1.
Bug Fixes:
-
BufferedMetricsLogger is now an actual class & type when you import it in TypeScript. That is, you can now do:
import { BufferedMetricsLogger } from 'datadog-metrics';

function useLogger(logger: BufferedMetricsLogger) {
    // ...
}
Previously, you would have had to declare the type for logger as typeof BufferedMetricsLogger.prototype. (#120)
View diff
0.11.4-a.1 (2024-10-31)
This pre-release is meant for testing a fix for #119.
Bug Fixes:
- Typings: Ensure
BufferedMetricsLogger is seen as an actual class & type when importing in TypeScript. (#120)
View diff
0.11.3 (2024-10-31)
⚠️ No changes in this release since v0.11.2. This fixes a publishing error with v0.11.3a1.
0.11.3a1 (2024-10-31)
⛔️ Do not use this release.
0.11.2 (2024-06-25)
Fixes & Maintenance:
-
Fix types and documentation for the aggregates option for histograms and the histogram.aggregates option for the library as a whole. It was previously listed as aggregations, which was incorrect. (Thanks to @Calyhre in #117.)
-
Improve documentation and add a more detailed error message about API keys vs. application keys. (#118)
View diff
0.11.1 (2023-09-28)
Fixes & Maintenance:
- Resolve a deprecation warning from the underlying datadog-api-client library. This also updates the minimum required version of that library. (Thanks to @acatalucci-synth & @fcsonline in #112.)
View diff
0.11.0 (2022-02-21)
New Features:
-
Built-in TypeScript definitions. If you use TypeScript, you no longer need to install separate type definitions from @types/datadog-metrics — they’re now built-in. Please make sure to remove @types/datadog-metrics from your dev dependencies.
Even if you’re writing regular JavaScript, you should now see better autocomplete suggestions and documentation in editors that support TypeScript definitions (e.g. VisualStudio Code, WebStorm).
Breaking Changes:
- datadog-metrics now uses modern
class syntax internally. In most cases, you shouldn’t need to change anything. However, if you are calling BufferedMetricsLogger.apply(...) or BufferedMetricsLogger.call(...), you’ll need to change your code to use new BufferedMetricsLogger(...) instead.
Deprecated Features:
-
The apiHost option has been renamed to site so that it matches up with Datadog docs and official packages. The old apiHost name still works for now, but will be removed in the future.
-
The reporters.DataDogReporter class has been renamed to reporters.DatadogReporter (lower-case D in "dog") so that it correctly matches Datadog’s actual name. The old name still works, but will be removed in the future.
View diff
0.10.2 (2022-10-14)
This release includes several new features and bugfixes!
New Features:
-
Support for distribution metrics. You can now send distributions to Datadog by doing:
const metrics = require('datadog-metrics');
metrics.distribution('my.metric.name', 3.8, ['tags:here']);
Distributions are similar to histograms (they create several metrics for count, average, percentiles, etc.), but they are calculated server-side on Datadog’s systems. For more details and guidance on when to use them, see:
(Thanks to @Mr0grog.)
-
Add an onError option for handling asynchronous errors while flushing buffered metrics. You can use this to get details on an error or to send error info to a tracking service like Sentry.io:
const metrics = require('datadog-metrics');
metrics.init({
    onError (error) {
        console.error('There was an error sending to Datadog:', error);
    }
});
-
The built-in reporter classes are now available for you to use. If you need to disable the metrics library for some reason, you can now do so with:
const metrics = require('datadog-metrics');
metrics.init({
    reporter: new metrics.reporters.NullReporter(),
});
(Thanks to @Mr0grog.)
-
Add an option for setting histogram defaults. In v0.10.0, the histogram() function gained the ability to set what aggregations and percentiles it generates with a final options argument. You can now specify a histogram option for init() or BufferedMetricsLogger in order to set default options for all calls to histogram(). Any options you set in the actual histogram() call will layer on top of the defaults:
const metrics = require('datadog-metrics');
metrics.init({
    histogram: {
        aggregates: ['sum', 'avg'],
        percentiles: [0.99]
    }
});

// Acts as if the options had been set to:
// { aggregates: ['sum', 'avg'], percentiles: [0.99] }
metrics.histogram('my.metric.name', 3.8);

// Acts as if the options had been set to:
// { aggregates: ['sum', 'avg'], percentiles: [0.5, 0.95] }
metrics.histogram('my.metric.name', 3.8, [], Date.now(), {
    percentiles: [0.5, 0.95]
});
(Thanks to @Mr0grog.)
-
Add a .median aggregation for histograms. When you log a histogram metric, it ultimately creates several metrics that track the minimum value, average value, maximum value, etc. There is now one that tracks the median value. StatsD creates the same metric from histograms, so you may find this useful if transitioning from StatsD. (Thanks to @Mr0grog.)
-
This package no longer locks specific versions of its dependencies (instead, your package manager can choose any version that is compatible). This may help when deduplicating packages for faster installs or smaller bundles. (Thanks to @Mr0grog.)
Bug Fixes:
- Don’t use
unref() on timers in non-Node.js environments. This is a step towards browser compatibility, although we are not testing browser-based usage yet. (Thanks to @Mr0grog.)
- The
apiHost option was broken in v0.10.0 and now works again. (Thanks to @Mr0grog and @npeters.)
- Creating a second instance of
BufferedMetricsLogger will not longer change the credentials used by previously created BufferedMetricsLogger instances. (Thanks to @Mr0grog.)
Internal Updates:
- Renamed the default branch in this repo to
main. (Thanks to @dbader.)
- Use GitHub actions for continuous integration. (Thanks to @Mr0grog.)
- Code style cleanup. (Thanks to @Mr0grog.)
- When flushing, send each metric with its own list of tags. This helps mitigate subtle errors where a change to one metric’s tags may affect others. (Thanks to @Mr0grog.)
View diff
0.10.1 (2022-09-11)
- FIX: bug in 0.10.0 where
@datadog/datadog-api-client was not used correctly. (Thanks to @gquinteros93)
View diff
0.10.0 (2022-09-08)
-
Breaking change: we now use Datadog’s official @datadog/datadog-api-client package to send metrics to Datadog. This makes datadog-metrics usable with Webpack, but removes the agent option. If you were using this option and the new library does not provide a way to meet your needs, please let us know by filing an issue! (Thanks to @thatguychrisw)
-
You can now customize what metrics are generated by a histogram. When logging a histogram metric, the 5th argument is an optional object with information about which aggregations and percentiles to create metrics for:
const metrics = require('datadog-metrics');
metrics.histogram('my.metric.name', 3.8, [], Date.now(), {
    // Aggregates can include 'max', 'min', 'sum', 'avg', or 'count'.
    aggregates: ['max', 'min', 'sum', 'avg', 'count'],
    // Percentiles can include any decimal between 0 and 1.
    percentiles: [0.75, 0.85, 0.95, 0.99]
});
(Thanks to @gquinteros93.)
-
INTERNAL: Clean up continuous integration on TravisCI. (Thanks to @ErikBoesen.)
View diff
0.9.3 (2021-03-22)
- INTERNAL: Update
dogapi and jshint to their latest versions. (Thanks to @ErikBoesen.)
View diff
0.9.2 (2021-03-14)
-
Expose new apiHost option on init() and BufferedMetricsLogger constructor. This makes it possible to actually configure the Datadog site to submit metrics to. For example, you can now submit metrics to Datadog’s Europe servers with:
const metrics = require('datadog-metrics');
metrics.init({
    apiHost: 'datadoghq.eu'
});
(Thanks to @ErikBoesen.)
View diff
0.9.1 (2021-02-19)
- FIX: Add default Datadog site. (Thanks to @ErikBoesen.)
View diff
0.9.0 (2021-02-10)
- Clean up continuous integration tooling on TravisCI. (Thanks to @rpelliard.)
- Correct “Datadog” throughout the documentation. It turns out there’s not supposed to be a captial D in the middle. (Thanks to @dbenamy.)
- INTERNAL: Add internal support for submitting metrics to different Datadog sites (e.g.
datadoghq.eu for Europe). (Thanks to @fermelone.)
View diff
0.8.2 (2020-11-16)
- Added @ErikBoesen as a maintainer!
- INTERNAL: Update
dogapi version.
- INTERNAL: Validate the
onSuccess callback in NullReporter. (Thanks to @dkMorlok.)
View diff
0.8.1
- FIX: don't increment count when value is 0 (Thanks to @haspriyank)
0.8.0
- allow passing in custom https agent (Thanks to @flovilmart)
0.7.0
- update metric type
counter to count as counter is deprecated by Datadog (Thanks to @dustingibbs)
0.6.1
0.6.0
- FIX: call onSuccess on flush even if buffer is empty (Thanks to @mousavian)
0.5.0
- ADD: ability to set custom timestamps (Thanks to @ronny)
- FIX: 0 as valid option for flushIntervalSeconds (thanks to @dkMorlok)
0.4.0
- ADD: Initialize with a default set of tags (thanks to @spence)
0.3.0
- FIX: Don't overwrite metrics with the same key but different tags when aggregating them (Thanks @akrylysov and @RavivIsraeli!)
- ADD: Add success/error callbacks to
metrics.flush() (Thanks @akrylysov!)
- ADD: Allow Datadog APP key to be configured (Thanks @gert-fresh!)
- Bump dependencies to latest
- Update docs
0.2.1
- Update docs (module code remains unchanged)
0.2.0
- API redesign
- Remove
setDefaultXYZ() and added init()
0.1.1
- Allow
increment to be called with a default value of 1
0.1.0
- The first proper release
- Rename
counter to increment
0.0.0
Meta
This module is heavily inspired by the Python dogapi module.
Daniel Bader – @dbader_org – mail@dbader.org
Distributed under the MIT license. See LICENSE for more information.
Your contributions are always welcome! See CONTRIBUTING.md for more.
https://github.com/dbader/node-datadog-metrics

