JavaScript Logging Libraries for Frontend and Full-Stack Applications
bunyan, debug, log4js, loglevel, pino, and winston are widely used JavaScript logging libraries that help developers track application behavior, diagnose issues, and monitor performance. While some were originally built for Node.js environments, several have evolved to support browser-based frontend use cases as well. These libraries differ significantly in architecture, performance characteristics, output format, extensibility, and suitability for client-side versus server-side contexts.
Npm Package Weekly Downloads Trend
Github Stars Ranking
Stat Detail
JavaScript Logging Libraries Compared: bunyan, debug, log4js, loglevel, pino, winston
Logging seems simple until you’re knee-deep in production incidents with no clear trail of what went wrong. The right logging library can mean the difference between a 5-minute fix and an all-nighter. But not all loggers are built alike — especially when you’re juggling frontend constraints like bundle size and browser compatibility alongside backend needs like performance and structured output.
Let’s break down how these six libraries handle real-world logging challenges.
🖥️ Browser Support: Where Can You Actually Use Them?
Not every logger plays nice in the browser. Some assume Node.js globals like process or filesystem access, which breaks in client-side code.
loglevel was built from the ground up for the browser. It’s tiny, uses console under the hood, and respects native devtools filtering. Perfect for SPAs or embedded widgets.
// loglevel: Simple browser logging
import log from 'loglevel';
log.setLevel('debug');
log.debug('User clicked button'); // Shows in browser console
winston and log4js offer official browser builds. Winston uses its transport system to route logs to console, while log4js provides appenders like browserConsole. Both work but add noticeable bundle weight.
pino has pino-browser, a separate package that mimics core behavior using console, but it’s opinionated about JSON formatting — which browsers don’t render beautifully by default.
bunyan has no official browser support. Attempts to shim it often fail due to its reliance on Node streams and synchronous disk writes.
debug works everywhere — it’s just a thin wrapper around console.log with namespace filtering. No build step needed.
⚡ Performance: How Much Does Logging Slow You Down?
In high-frequency scenarios (e.g., request logging in APIs), logger overhead matters.
pino is the speed king. It avoids object serialization during hot paths by using asynchronous flushing and string concatenation. Logs are written as newline-delimited JSON, ready for ingestion by tools like Fluentd or Loki.
// pino: Fast structured logging
const logger = require('pino')();
logger.info({ userId: 123 }, 'User logged in');
// Output: {"level":30,"time":1712345678901,"pid":12345,"hostname":"...","userId":123,"msg":"User logged in"}
bunyan is also performant in Node but slower than pino due to synchronous object creation and richer metadata by default.
winston and log4js are heavier because they support synchronous multi-transport dispatch (e.g., writing to file + sending to HTTP endpoint at once). This flexibility costs CPU cycles.
loglevel and debug are fast in the browser because they delegate entirely to console — but only if you disable logging in production (via minification or runtime checks).
📦 Structure vs. Readability: JSON Logs or Human-Friendly?
Do you want logs that machines parse easily or ones developers read directly?
pino and bunyan enforce structured JSON. Great for log aggregation, terrible for tailing files locally unless you pipe through their CLI formatters (pino-pretty, bunyan -o short).
# Pretty-print pino logs
node app.js | pino-pretty
winston, log4js, and loglevel default to human-readable strings but allow JSON formatting via options or formatters.
// winston: Switch between formats
const { createLogger, format, transports } = require('winston');
const logger = createLogger({
  format: format.combine(
    format.timestamp(),
    format.json() // or format.simple()
  ),
  transports: [new transports.Console()]
});
debug is purely human-readable — just plain strings with colored namespaces.
🔌 Extensibility: Transports, Formatters, and Plugins
Need to send logs to Slack, Datadog, or rotate files daily? That’s where transports and appenders come in.
winston leads here with a vast ecosystem of transports (winston-daily-rotate-file, winston-slack, etc.). Its architecture treats every output as a “transport,” making it trivial to log to multiple destinations.
log4js uses “appenders” with similar flexibility — you can chain them, filter by level, or write custom ones.
pino takes a Unix philosophy approach: do one thing well (emit JSON lines), then pipe to external tools. Integrations exist (e.g., pino-datadog), but they’re often separate processes, not in-process transports.
loglevel supports plugins for things like prefixing or localStorage persistence, but nothing for remote shipping.
debug has no extension mechanism — it’s intentionally minimal.
bunyan supports custom streams (its version of transports), but the ecosystem is smaller than Winston’s.
🧪 Development Experience: Filtering and Debugging
During local development, you want fine-grained control over what logs appear.
debug excels here. Set localStorage.debug = 'myapp:*' in the browser or DEBUG=myapp:* node app.js in Node to enable only relevant logs.
// debug: Namespace-based filtering
const log = require('debug')('myapp:auth');
log('Login attempt'); // Only shows if DEBUG includes 'myapp:auth'
loglevel lets you set global or individual logger levels at runtime — useful for enabling trace logs in a live browser session.
winston and log4js support per-logger levels but require programmatic changes or config reloads, which is clunkier for ad-hoc debugging.
pino and bunyan rely on external tools for filtering (e.g., grep or log shipper rules), which isn’t ideal during active development.
🛑 What About Deprecation or Maintenance?
None of these packages are officially deprecated. However, bunyan has seen minimal updates in recent years, and its author recommends pino for new projects. While still functional, it’s effectively in maintenance mode.
🤝 Key Similarities Across All Libraries
Despite their differences, these loggers share common ground:
1. Support Standard Log Levels
All provide at least error, warn, info, and debug (or equivalent). This enables consistent severity-based filtering.
// Common pattern across libraries
logger.error('Database connection failed');
logger.warn('Deprecated API used');
logger.info('Server started');
logger.debug('Request payload:', payload);
2. Allow Custom Metadata
You can attach context like user IDs, request IDs, or timestamps to enrich logs.
// winston example
logger.info('Payment processed', { userId: 456, amount: 29.99 });

// pino example
logger.info({ userId: 456, amount: 29.99 }, 'Payment processed');
3. Enable Conditional Logging
All respect log level thresholds — calls below the current level are no-ops, minimizing runtime cost.
4. Work with Modern Toolchains
Each supports ES modules (either natively or via bundlers like Webpack or Vite), TypeScript definitions, and tree-shaking where applicable.
5. Integrate with Observability Stacks
Whether you use ELK, Grafana Loki, Datadog, or Splunk, structured logs from any of these can feed into your pipeline — though pino and bunyan require less transformation due to native JSON.
📊 Summary: When to Use Which Logger
| Scenario | Best Choice | Why |
|---|---|---|
| Frontend-only app, small bundle | loglevel | Tiny, browser-native, clean console output |
| Library author needing dev-time debug logs | debug | Zero-config, namespace filtering, universal support |
| High-performance Node.js service | pino | Blazing fast, structured JSON, async-friendly |
| Full-stack app needing consistency | winston | Unified API across environments, rich transport ecosystem |
| Migrating from Java/Log4j | log4js | Familiar concepts (appenders, categories), config-driven |
| Legacy Node.js project (avoid new) | bunyan | Still works, but prefer pino for new work |
💡 Final Recommendation
For new frontend projects, start with loglevel — it’s purpose-built for the browser and gets out of your way. If you’re building a library, sprinkle in debug for optional developer diagnostics.
For Node.js backends, pino is the modern default for performance-critical services. Choose winston if you need maximum flexibility in routing logs to multiple destinations without external tooling.
Avoid mixing more than two loggers in one codebase — it creates inconsistency and complicates log aggregation. Pick one primary logger and stick with it across your stack where possible.
How to Choose: bunyan vs debug vs log4js vs loglevel vs pino vs winston
- bunyan:
Choose
bunyanif you're working in a Node.js environment and need structured JSON logging with strong CLI tooling for log inspection. It’s not ideal for browser use due to its Node-centric design and lack of lightweight browser builds. Avoid it for frontend-only projects or when human-readable console output is preferred during development. - debug:
Choose
debugwhen you need a minimal, zero-dependency utility for conditional logging during development, especially for library authors or internal debugging workflows. It shines with its simple namespace-based filtering via theDEBUGenvironment variable but lacks production-grade features like log levels, transports, or structured output—so don’t use it as your primary application logger in production. - log4js:
Choose
log4jsif you’re migrating from Java’s Log4j ecosystem or need a familiar hierarchical logger with appenders, categories, and configuration-driven behavior. It supports both Node.js and browser environments and offers decent flexibility, but its API can feel verbose compared to modern alternatives, and performance isn’t optimized for high-throughput scenarios. - loglevel:
Choose
loglevelfor frontend applications where you need a tiny, browser-first logging solution with standard log levels (trace to error) and plugin support. It’s ideal when bundle size matters, you want clean console output, and you don’t need structured logging or server-side features. Avoid it if you require JSON output, log rotation, or advanced transport mechanisms. - pino:
Choose
pinowhen performance and structured JSON logging are critical—especially in high-throughput Node.js services. Its asynchronous, stream-based design minimizes overhead, and it integrates well with log aggregation pipelines. While browser support exists viapino-browser, it’s less ergonomic than dedicated frontend loggers; best paired with a backend logging strategy rather than used standalone in the browser. - winston:
Choose
winstonif you need a highly configurable, transport-agnostic logging system that works consistently across Node.js and browser environments. Its modular architecture supports multiple outputs (console, file, HTTP, etc.) simultaneously and allows custom formatting and filtering. It’s a solid default choice for full-stack apps but may be overkill for simple frontend-only logging needs.
Popular Comparisons
README for bunyan


Bunyan is a simple and fast JSON logging library for node.js services:
var bunyan = require('bunyan');
var log = bunyan.createLogger({name: "myapp"});
log.info("hi");
and a bunyan CLI tool for nicely viewing those logs:
Manifesto: Server logs should be structured. JSON's a good format. Let's do
that. A log record is one line of JSON.stringify'd output. Let's also
specify some common names for the requisite and common fields for a log
record (see below).
Table of Contents
- Current Status
- Installation
- Features
- Introduction
- Levels
- Log Record Fields
- Streams
- Runtime log snooping via DTrace
- Runtime environments
- Versioning
- License
- See Also
Current Status
Solid core functionality is there. Joyent is using this for a number of production services. Bunyan supports node 0.10 and greater. Follow @trentmick for updates to Bunyan.
There is an email discussion list bunyan-logging@googlegroups.com, also as a forum in the browser.
Installation
npm install bunyan
Tip: The bunyan CLI tool is written to be compatible (within reason) with
all versions of Bunyan logs. Therefore you might want to npm install -g bunyan
to get the bunyan CLI on your PATH, then use local bunyan installs for
node.js library usage of bunyan in your apps.
Tip: Installing without optional dependencies can dramatically reduce
bunyan's install size. dtrace-provider is used for dtrace features,
mv is used for RotatingFileStream, and moment is used for local time.
If you don't need these features, consider installing with the
--no-optional flag.
Features
- elegant log method API
- extensible streams system for controlling where log records go (to a stream, to a file, log file rotation, etc.)
bunyanCLI for pretty-printing and filtering of Bunyan logs- simple include of log call source location (file, line, function) with
src: true - lightweight specialization of Logger instances with
log.child - custom rendering of logged objects with "serializers"
- Runtime log snooping via DTrace support
- Support for a few runtime environments: Node.js, Browserify, Webpack, NW.js.
Introduction
Like most logging libraries you create a Logger instance and call methods named after the logging levels:
// hi.js
var bunyan = require('bunyan');
var log = bunyan.createLogger({name: 'myapp'});
log.info('hi');
log.warn({lang: 'fr'}, 'au revoir');
All loggers must provide a "name". This is somewhat akin to the log4j logger "name", but Bunyan doesn't do hierarchical logger names.
Bunyan log records are JSON. A few fields are added automatically: "pid", "hostname", "time" and "v".
$ node hi.js
{"name":"myapp","hostname":"banana.local","pid":40161,"level":30,"msg":"hi","time":"2013-01-04T18:46:23.851Z","v":0}
{"name":"myapp","hostname":"banana.local","pid":40161,"level":40,"lang":"fr","msg":"au revoir","time":"2013-01-04T18:46:23.853Z","v":0}
Constructor API
var bunyan = require('bunyan');
var log = bunyan.createLogger({
    name: <string>,                     // Required
    level: <level name or number>,      // Optional, see "Levels" section
    stream: <node.js stream>,           // Optional, see "Streams" section
    streams: [<bunyan streams>, ...],   // Optional, see "Streams" section
    serializers: <serializers mapping>, // Optional, see "Serializers" section
    src: <boolean>,                     // Optional, see "src" section

    // Any other fields are added to all log records as is.
    foo: 'bar',
    ...
});
Log Method API
The example above shows two different ways to call log.info(...). The
full API is:
log.info();     // Returns a boolean: is the "info" level enabled?
                // This is equivalent to `log.isInfoEnabled()` or
                // `log.isEnabledFor(INFO)` in log4j.

log.info('hi');                     // Log a simple string message (or number).
log.info('hi %s', bob, anotherVar); // Uses `util.format` for msg formatting.

log.info({foo: 'bar'}, 'hi');
                // The first field can optionally be a "fields" object, which
                // is merged into the log record.

log.info(err);  // Special case to log an `Error` instance to the record.
                // This adds an "err" field with exception details
                // (including the stack) and sets "msg" to the exception
                // message.
log.info(err, 'more on this: %s', more);
                // ... or you can specify the "msg".

log.info({foo: 'bar', err: err}, 'some msg about this error');
                // To pass in an Error *and* other fields, use the `err`
                // field name for the Error instance.
Note that this implies you cannot blindly pass any object as the first
argument to log it because that object might include fields that collide with
Bunyan's core record fields. In other words,
log.info(mywidget) may not yield what you expect. Instead of a string
representation of mywidget that other logging libraries may give you, Bunyan
will try to JSON-ify your object. It is a Bunyan best practice to always give a
field name to included objects, e.g.:
log.info({widget: mywidget}, ...)
This will dove-tail with Bunyan serializer support, discussed later.
The same goes for all of Bunyan's log levels: log.trace, log.debug,
log.info, log.warn, log.error, and log.fatal. See the levels
section below for details and suggestions.
CLI Usage
Bunyan log output is a stream of JSON objects. This is great for processing,
but not for reading directly. A bunyan tool is provided for
pretty-printing bunyan logs and for filtering (e.g.
| bunyan -c 'this.foo == "bar"'). Using our example above:
$ node hi.js | ./node_modules/.bin/bunyan
[2013-01-04T19:01:18.241Z]  INFO: myapp/40208 on banana.local: hi
[2013-01-04T19:01:18.242Z]  WARN: myapp/40208 on banana.local: au revoir (lang=fr)
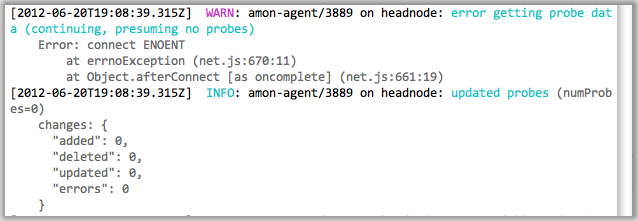
See the screenshot above for an example of the default coloring of rendered
log output. That example also shows the nice formatting automatically done for
some well-known log record fields (e.g. req is formatted like an HTTP request,
res like an HTTP response, err like an error stack trace).
One interesting feature is filtering of log content, which can be useful for digging through large log files or for analysis. We can filter only records above a certain level:
$ node hi.js | bunyan -l warn
[2013-01-04T19:08:37.182Z]  WARN: myapp/40353 on banana.local: au revoir (lang=fr)
Or filter on the JSON fields in the records (e.g. only showing the French records in our contrived example):
$ node hi.js | bunyan -c 'this.lang == "fr"'
[2013-01-04T19:08:26.411Z]  WARN: myapp/40342 on banana.local: au revoir (lang=fr)
See bunyan --help for other facilities.
Streams Introduction
By default, log output is to stdout and at the "info" level. Explicitly that looks like:
var log = bunyan.createLogger({
    name: 'myapp',
    stream: process.stdout,
    level: 'info'
});
That is an abbreviated form for a single stream. You can define multiple streams at different levels.
var log = bunyan.createLogger({
  name: 'myapp',
  streams: [
    {
      level: 'info',
      stream: process.stdout            // log INFO and above to stdout
    },
    {
      level: 'error',
      path: '/var/tmp/myapp-error.log'  // log ERROR and above to a file
    }
  ]
});
More on streams in the Streams section below.
log.child
Bunyan has a concept of a child logger to specialize a logger for a
sub-component of your application, i.e. to create a new logger with
additional bound fields that will be included in its log records. A child
logger is created with log.child(...).
In the following example, logging on a "Wuzzle" instance's this.log will
be exactly as on the parent logger with the addition of the widget_type
field:
var bunyan = require('bunyan');
var log = bunyan.createLogger({name: 'myapp'});

function Wuzzle(options) {
    this.log = options.log.child({widget_type: 'wuzzle'});
    this.log.info('creating a wuzzle')
}
Wuzzle.prototype.woos = function () {
    this.log.warn('This wuzzle is woosey.')
}

log.info('start');
var wuzzle = new Wuzzle({log: log});
wuzzle.woos();
log.info('done');
Running that looks like (raw):
$ node myapp.js
{"name":"myapp","hostname":"myhost","pid":34572,"level":30,"msg":"start","time":"2013-01-04T07:47:25.814Z","v":0}
{"name":"myapp","hostname":"myhost","pid":34572,"widget_type":"wuzzle","level":30,"msg":"creating a wuzzle","time":"2013-01-04T07:47:25.815Z","v":0}
{"name":"myapp","hostname":"myhost","pid":34572,"widget_type":"wuzzle","level":40,"msg":"This wuzzle is woosey.","time":"2013-01-04T07:47:25.815Z","v":0}
{"name":"myapp","hostname":"myhost","pid":34572,"level":30,"msg":"done","time":"2013-01-04T07:47:25.816Z","v":0}
And with the bunyan CLI (using the "short" output mode):
$ node myapp.js  | bunyan -o short
07:46:42.707Z  INFO myapp: start
07:46:42.709Z  INFO myapp: creating a wuzzle (widget_type=wuzzle)
07:46:42.709Z  WARN myapp: This wuzzle is woosey. (widget_type=wuzzle)
07:46:42.709Z  INFO myapp: done
A more practical example is in the
node-restify web framework.
Restify uses Bunyan for its logging. One feature of its integration, is that
if server.use(restify.requestLogger()) is used, each restify request handler
includes a req.log logger that is:
log.child({req_id: <unique request id>}, true)
Apps using restify can then use req.log and have all such log records
include the unique request id (as "req_id"). Handy.
Serializers
Bunyan has a concept of "serializer" functions to produce a JSON-able object from a JavaScript object, so you can easily do the following:
log.info({req: <request object>}, 'something about handling this request');
and have the req entry in the log record be just a reasonable subset of
<request object> fields (or computed data about those fields).
A logger instance can have a serializers mapping of log record field name
("req" in this example) to a serializer function. When creating the log
record, Bunyan will call the serializer function for fields of that name.
An example:
function reqSerializer(req) {
    return {
        method: req.method,
        url: req.url,
        headers: req.headers
    };
}
var log = bunyan.createLogger({
    name: 'myapp',
    serializers: {
        req: reqSerializer
    }
});
Typically serializers are added to a logger at creation time via
bunyan.createLogger({..., serializers: <serializers>}). However, serializers
can be added after creation via <logger>.addSerializers(...), e.g.:
var log = bunyan.createLogger({name: 'myapp'});
log.addSerializers({req: reqSerializer});
Requirements for serializers functions
A serializer function is passed unprotected objects that are passed to the
log.info, log.debug, etc. call. This means a poorly written serializer
function can cause side-effects. Logging shouldn't do that. Here are a few
rules and best practices for serializer functions:
-
A serializer function should never throw. The bunyan library does protect somewhat from this: if the serializer throws an error, then bunyan will (a) write an ugly message on stderr (along with the traceback), and (b) the field in the log record will be replaced with a short error message. For example:
bunyan: ERROR: Exception thrown from the "foo" Bunyan serializer. This should never happen. This is a bug in that serializer function. TypeError: Cannot read property 'not' of undefined at Object.fooSerializer [as foo] (/Users/trentm/tm/node-bunyan/bar.js:8:26) at /Users/trentm/tm/node-bunyan/lib/bunyan.js:873:50 at Array.forEach (native) at Logger._applySerializers (/Users/trentm/tm/node-bunyan/lib/bunyan.js:865:35) at mkRecord (/Users/trentm/tm/node-bunyan/lib/bunyan.js:978:17) at Logger.info (/Users/trentm/tm/node-bunyan/lib/bunyan.js:1044:19) at Object.<anonymous> (/Users/trentm/tm/node-bunyan/bar.js:13:5) at Module._compile (module.js:409:26) at Object.Module._extensions..js (module.js:416:10) at Module.load (module.js:343:32) {"name":"bar","hostname":"danger0.local","pid":47411,"level":30,"foo":"(Error in Bunyan log \"foo\" serializer broke field. See stderr for details.)","msg":"one","time":"2017-03-08T02:53:51.173Z","v":0} -
A serializer function should never mutate the given object. Doing so will change the object in your application.
-
A serializer function should be defensive. In my experience, it is common to set a serializer in an app, say for field name "foo", and then accidentally have a log line that passes a "foo" that is undefined, or null, or of some unexpected type. A good start at defensiveness is to start with this:
function fooSerializer(foo) {
    // Guard against foo be null/undefined. Check that expected fields
    // are defined.
    if (!foo || !foo.bar)
        return foo;
    var obj = {
        // Create the object to be logged.
        bar: foo.bar
    }
    return obj;
};
Standard Serializers
Bunyan includes a small set of "standard serializers", exported as
bunyan.stdSerializers. Their use is completely optional. An example using
all of them:
var log = bunyan.createLogger({
    name: 'myapp',
    serializers: bunyan.stdSerializers
});
or particular ones:
var log = bunyan.createLogger({
    name: 'myapp',
    serializers: {err: bunyan.stdSerializers.err}
});
Standard serializers are:
| Field | Description |
|---|---|
| err | Used for serializing JavaScript error objects, including traversing an error's cause chain for error objects with a .cause() -- e.g. as from verror. |
| req | Common fields from a node.js HTTP request object. |
| res | Common fields from a node.js HTTP response object. |
Note that the req and res serializers intentionally do not include the
request/response body, as that can be prohibitively large. If helpful, the
restify framework's audit logger plugin
has its own req/res serializers that include more information (optionally
including the body).
src
The source file, line and function of the log call site can be added to
log records by using the src: true config option:
var log = bunyan.createLogger({src: true, ...});
This adds the call source info with the 'src' field, like this:
{
  "name": "src-example",
  "hostname": "banana.local",
  "pid": 123,
  "component": "wuzzle",
  "level": 4,
  "msg": "This wuzzle is woosey.",
  "time": "2012-02-06T04:19:35.605Z",
  "src": {
    "file": "/Users/trentm/tm/node-bunyan/examples/src.js",
    "line": 20,
    "func": "Wuzzle.woos"
  },
  "v": 0
}
WARNING: Determining the call source info is slow. Never use this option in production.
Levels
The log levels in bunyan are as follows. The level descriptions are best practice opinions of the author.
- "fatal" (60): The service/app is going to stop or become unusable now. An operator should definitely look into this soon.
- "error" (50): Fatal for a particular request, but the service/app continues servicing other requests. An operator should look at this soon(ish).
- "warn" (40): A note on something that should probably be looked at by an operator eventually.
- "info" (30): Detail on regular operation.
- "debug" (20): Anything else, i.e. too verbose to be included in "info" level.
- "trace" (10): Logging from external libraries used by your app or very detailed application logging.
Setting a logger instance (or one of its streams) to a particular level implies that all log records at that level and above are logged. E.g. a logger set to level "info" will log records at level info and above (warn, error, fatal).
While using log level names is preferred, the actual level values are integers
internally (10 for "trace", ..., 60 for "fatal"). Constants are defined for
the levels: bunyan.TRACE ... bunyan.FATAL. The lowercase level names are
aliases supported in the API, e.g. log.level("info"). There is one exception:
DTrace integration uses the level names. The fired DTrace probes are named
'bunyan-$levelName'.
Here is the API for querying and changing levels on an existing logger. Recall that a logger instance has an array of output "streams":
log.level() -> INFO   // gets current level (lowest level of all streams)

log.level(INFO)       // set all streams to level INFO
log.level("info")     // set all streams to level INFO

log.levels() -> [DEBUG, INFO]   // get array of levels of all streams
log.levels(0) -> DEBUG          // get level of stream at index 0
log.levels("foo")               // get level of stream with name "foo"

log.levels(0, INFO)             // set level of stream 0 to INFO
log.levels(0, "info")           // can use "info" et al aliases
log.levels("foo", WARN)         // set stream named "foo" to WARN
Level suggestions
Trent's biased suggestions for server apps: Use "debug" sparingly. Information that will be useful to debug errors post mortem should usually be included in "info" messages if it's generally relevant or else with the corresponding "error" event. Don't rely on spewing mostly irrelevant debug messages all the time and sifting through them when an error occurs.
Trent's biased suggestions for node.js libraries: IMHO, libraries should only
ever log at trace-level. Fine control over log output should be up to the
app using a library. Having a library that spews log output at higher levels
gets in the way of a clear story in the app logs.
Log Record Fields
This section will describe rules for the Bunyan log format: field names,
field meanings, required fields, etc. However, a Bunyan library doesn't
strictly enforce all these rules while records are being emitted. For example,
Bunyan will add a time field with the correct format to your log records,
but you can specify your own. It is the caller's responsibility to specify
the appropriate format.
The reason for the above leniency is because IMO logging a message should
never break your app. This leads to this rule of logging: a thrown
exception from log.info(...) or equivalent (other than for calling with the
incorrect signature) is always a bug in Bunyan.
A typical Bunyan log record looks like this:
{"name":"myserver","hostname":"banana.local","pid":123,"req":{"method":"GET","url":"/path?q=1#anchor","headers":{"x-hi":"Mom","connection":"close"}},"level":3,"msg":"start request","time":"2012-02-03T19:02:46.178Z","v":0}
Pretty-printed:
{
  "name": "myserver",
  "hostname": "banana.local",
  "pid": 123,
  "req": {
    "method": "GET",
    "url": "/path?q=1#anchor",
    "headers": {
      "x-hi": "Mom",
      "connection": "close"
    },
    "remoteAddress": "120.0.0.1",
    "remotePort": 51244
  },
  "level": 3,
  "msg": "start request",
  "time": "2012-02-03T19:02:57.534Z",
  "v": 0
}
Core fields
v: Required. Integer. Added by Bunyan. Cannot be overridden. This is the Bunyan log format version (require('bunyan').LOG_VERSION). The log version is a single integer.0is until I release a version "1.0.0" of node-bunyan. Thereafter, starting with1, this will be incremented if there is any backward incompatible change to the log record format. Details will be in "CHANGES.md" (the change log).level: Required. Integer. Added by Bunyan. Cannot be overridden. See the "Levels" section.name: Required. String. Provided at Logger creation. You must specify a name for your logger when creating it. Typically this is the name of the service/app using Bunyan for logging.hostname: Required. String. Provided or determined at Logger creation. You can specify your hostname at Logger creation or it will be retrieved viaos.hostname().pid: Required. Integer. Filled in automatically at Logger creation.time: Required. String. Added by Bunyan. Can be overridden. The date and time of the event in ISO 8601 Extended Format format and in UTC, as fromDate.toISOString().msg: Required. String. Everylog.debug(...)et al call must provide a log message.src: Optional. Object giving log call source info. This is added automatically by Bunyan if the "src: true" config option is given to the Logger. Never use in production as this is really slow.
Go ahead and add more fields, and nested ones are fine (and recommended) as well. This is why we're using JSON. Some suggestions and best practices follow (feedback from actual users welcome).
Recommended/Best Practice Fields
-
err: Object. A caught JS exception. Log that thing withlog.info(err)to get:... "err": { "message": "boom", "name": "TypeError", "stack": "TypeError: boom\n at Object.<anonymous> ..." }, "msg": "boom", ...Or use the
bunyan.stdSerializers.errserializer in your Logger and do thislog.error({err: err}, "oops"). See "examples/err.js". -
req_id: String. A request identifier. Including this field in all logging tied to handling a particular request to your server is strongly suggested. This allows post analysis of logs to easily collate all related logging for a request. This really shines when you have a SOA with multiple services and you carry a single request ID from the top API down through all APIs (as node-restify facilitates with its 'Request-Id' header). -
req: An HTTP server request. Bunyan providesbunyan.stdSerializers.reqto serialize a request with a suggested set of keys. Example:{ "method": "GET", "url": "/path?q=1#anchor", "headers": { "x-hi": "Mom", "connection": "close" }, "remoteAddress": "120.0.0.1", "remotePort": 51244 } -
res: An HTTP server response. Bunyan providesbunyan.stdSerializers.resto serialize a response with a suggested set of keys. Example:{ "statusCode": 200, "header": "HTTP/1.1 200 OK\r\nContent-Type: text/plain\r\nConnection: keep-alive\r\nTransfer-Encoding: chunked\r\n\r\n" }
Other fields to consider
req.username: Authenticated user (or for a 401, the user attempting to auth).- Some mechanism to calculate response latency. "restify" users will have
an "X-Response-Time" header. A
latencycustom field would be fine. req.body: If you know that request bodies are small (common in APIs, for example), then logging the request body is good.
Streams
A "stream" is Bunyan's name for where it outputs log messages (the equivalent to a log4j Appender). Ultimately Bunyan uses a Writable Stream interface, but there are some additional attributes used to create and manage the stream. A Bunyan Logger instance has one or more streams. In general streams are specified with the "streams" option:
var bunyan = require('bunyan');
var log = bunyan.createLogger({
    name: "foo",
    streams: [
        {
            stream: process.stderr,
            level: "debug"
        },
        ...
    ]
});
For convenience, if there is only one stream, it can be specified with the
"stream" and "level" options (internally converted to a Logger.streams).
var log = bunyan.createLogger({
    name: "foo",
    stream: process.stderr,
    level: "debug"
});
Note that "file" streams do not support this shortcut (partly for historical reasons and partly to not make it difficult to add a literal "path" field on log records).
If neither "streams" nor "stream" are specified, the default is a stream of
type "stream" emitting to process.stdout at the "info" level.
Adding a Stream
After a bunyan instance has been initialized, you may add additional streams by
calling the addStream function.
var bunyan = require('bunyan');
var log = bunyan.createLogger('myLogger');
log.addStream({
  name: "myNewStream",
  stream: process.stderr,
  level: "debug"
});
stream errors
A Bunyan logger instance can be made to re-emit "error" events from its
streams. Bunyan does so by default for type === "file"
streams, so you can do this:
var log = bunyan.createLogger({name: 'mylog', streams: [{path: LOG_PATH}]});
log.on('error', function (err, stream) {
    // Handle stream write or create error here.
});
As of bunyan@1.7.0, the reemitErrorEvents field can be used when adding a
stream to control whether "error" events are re-emitted on the Logger. For
example:
var EventEmitter = require('events').EventEmitter;
var util = require('util');

function MyFlakyStream() {}
util.inherits(MyFlakyStream, EventEmitter);

MyFlakyStream.prototype.write = function (rec) {
    this.emit('error', new Error('boom'));
}

var log = bunyan.createLogger({
    name: 'this-is-flaky',
    streams: [
        {
            type: 'raw',
            stream: new MyFlakyStream(),
            reemitErrorEvents: true
        }
    ]
});
log.info('hi there');
The behaviour is as follows:
reemitErrorEventsnot specified:filestreams will re-emit error events on the Logger instance.reemitErrorEvents: true: error events will be re-emitted on the Logger for any stream with a.on()function -- which includes file streams, process.stdout/stderr, and any object that inherits from EventEmitter.reemitErrorEvents: false: error events will not be re-emitted for any streams.
Note: "error" events are not related to log records at the "error" level
as produced by log.error(...). See the node.js docs on error
events for details.
stream type: stream
A type === 'stream' is a plain ol' node.js Writable
Stream. A
"stream" (the writable stream) field is required. E.g.: process.stdout,
process.stderr.
var log = bunyan.createLogger({
    name: 'foo',
    streams: [{
        stream: process.stderr
        // `type: 'stream'` is implied
    }]
});
| Field | Required? | Default | Description |
|---|---|---|---|
| stream | Yes | - | A "Writable Stream", e.g. a std handle or an open file write stream. |
| type | No | n/a | `type == 'stream'` is implied if the `stream` field is given. |
| level | No | info | The level to which logging to this stream is enabled. If not specified it defaults to "info". If specified this can be one of the level strings ("trace", "debug", ...) or constants (`bunyan.TRACE`, `bunyan.DEBUG`, ...). This serves as a severity threshold for that stream so logs of greater severity will also pass through (i.e. If level="warn", error and fatal will also pass through this stream). |
| name | No | - | A name for this stream. This may be useful for usage of `log.level(NAME, LEVEL)`. See the [Levels section](https://www.npmjs.com/package/bunyan#levels) for details. A stream "name" isn't used for anything else. |
stream type: file
A type === 'file' stream requires a "path" field. Bunyan will open this
file for appending. E.g.:
var log = bunyan.createLogger({
    name: 'foo',
    streams: [{
        path: '/var/log/foo.log',
        // `type: 'file'` is implied
    }]
});
| Field | Required? | Default | Description |
|---|---|---|---|
| path | Yes | - | A file path to which to log. |
| type | No | n/a | `type == 'file'` is implied if the `path` field is given. |
| level | No | info | The level to which logging to this stream is enabled. If not specified it defaults to "info". If specified this can be one of the level strings ("trace", "debug", ...) or constants (`bunyan.TRACE`, `bunyan.DEBUG`, ...). This serves as a severity threshold for that stream so logs of greater severity will also pass through (i.e. If level="warn", error and fatal will also pass through this stream). |
| name | No | - | A name for this stream. This may be useful for usage of `log.level(NAME, LEVEL)`. See the [Levels section](https://www.npmjs.com/package/bunyan#levels) for details. A stream "name" isn't used for anything else. |
stream type: rotating-file
WARNING on node 0.8 usage: Users of Bunyan's rotating-file should (a) be
using at least bunyan 0.23.1 (with the fix for this
issue), and (b) should use at
least node 0.10 (node 0.8 does not support the unref() method on
setTimeout(...) needed for the mentioned fix). The symptom is that process
termination will hang for up to a full rotation period.
WARNING on cluster
usage: Using Bunyan's rotating-file stream with node.js's "cluster" module
can result in unexpected file rotation. You must not have multiple processes
in the cluster logging to the same file path. In other words, you must have
a separate log file path for the master and each worker in the cluster.
Alternatively, consider using a system file rotation facility such as
logrotate on Linux or logadm on SmartOS/Illumos. See
this comment on issue #117
for details.
A type === 'rotating-file' is a file stream that handles file automatic
rotation.
var log = bunyan.createLogger({
    name: 'foo',
    streams: [{
        type: 'rotating-file',
        path: '/var/log/foo.log',
        period: '1d',   // daily rotation
        count: 3        // keep 3 back copies
    }]
});
This will rotate '/var/log/foo.log' every day (at midnight) to:
/var/log/foo.log.0     # yesterday
/var/log/foo.log.1     # 1 day ago
/var/log/foo.log.2     # 2 days ago
Currently, there is no support for providing a template for the rotated files, or for rotating when the log reaches a threshold size.
| Field | Required? | Default | Description |
|---|---|---|---|
| type | Yes | - | "rotating-file" |
| path | Yes | - | A file path to which to log. Rotated files will be "$path.0", "$path.1", ... |
| period | No | 1d | The period at which to rotate. This is a string of the format "$number$scope" where "$scope" is one of "ms" (milliseconds -- only useful for testing), "h" (hours), "d" (days), "w" (weeks), "m" (months), "y" (years). Or one of the following names can be used "hourly" (means 1h), "daily" (1d), "weekly" (1w), "monthly" (1m), "yearly" (1y). Rotation is done at the start of the scope: top of the hour (h), midnight (d), start of Sunday (w), start of the 1st of the month (m), start of Jan 1st (y). |
| count | No | 10 | The number of rotated files to keep. |
| level | No | info | The level at which logging to this stream is enabled. If not specified it defaults to "info". If specified this can be one of the level strings ("trace", "debug", ...) or constants (`bunyan.TRACE`, `bunyan.DEBUG`, ...). |
| name | No | - | A name for this stream. This may be useful for usage of `log.level(NAME, LEVEL)`. See the [Levels section](https://www.npmjs.com/package/bunyan#levels) for details. A stream "name" isn't used for anything else. |
Note on log rotation: Often you may be using external log rotation utilities
like logrotate on Linux or logadm on SmartOS/Illumos. In those cases, unless
you are ensuring "copy and truncate" semantics (via copytruncate with
logrotate or -c with logadm) then the fd for your 'file' stream will change.
You can tell bunyan to reopen the file stream with code like this in your
app:
var log = bunyan.createLogger(...);
...
process.on('SIGUSR2', function () {
    log.reopenFileStreams();
});
where you'd configure your log rotation to send SIGUSR2 (or some other signal)
to your process. Any other mechanism to signal your app to run
log.reopenFileStreams() would work as well.
stream type: raw
raw: Similar to a "stream" writable stream, except that the write method is given raw log record Objects instead of a JSON-stringified string. This can be useful for hooking on further processing to all Bunyan logging: pushing to an external service, a RingBuffer (see below), etc.
raw + RingBuffer Stream
Bunyan comes with a special stream called a RingBuffer which keeps the last N records in memory and does not write the data anywhere else. One common strategy is to log 'info' and higher to a normal log file but log all records (including 'trace') to a ringbuffer that you can access via a debugger, or your own HTTP interface, or a post-mortem facility like MDB or node-panic.
To use a RingBuffer:
/* Create a ring buffer that stores the last 100 records. */
var bunyan = require('bunyan');
var ringbuffer = new bunyan.RingBuffer({ limit: 100 });
var log = bunyan.createLogger({
    name: 'foo',
    streams: [
        {
            level: 'info',
            stream: process.stdout
        },
        {
            level: 'trace',
            type: 'raw',    // use 'raw' to get raw log record objects
            stream: ringbuffer
        }
    ]
});

log.info('hello world');
console.log(ringbuffer.records);
This example emits:
[ { name: 'foo',
    hostname: '912d2b29',
    pid: 50346,
    level: 30,
    msg: 'hello world',
    time: '2012-06-19T21:34:19.906Z',
    v: 0 } ]
third-party streams
See the user-maintained list in the Bunyan wiki.
Runtime log snooping via DTrace
On systems that support DTrace (e.g., illumos derivatives like SmartOS and
OmniOS, FreeBSD, Mac), Bunyan will create a DTrace provider (bunyan) that
makes available the following probes:
log-trace
log-debug
log-info
log-warn
log-error
log-fatal
Each of these probes has a single argument: the string that would be written to the log. Note that when a probe is enabled, it will fire whenever the corresponding function is called, even if the level of the log message is less than that of any stream.
DTrace examples
Trace all log messages coming from any Bunyan module on the system.
(The -x strsize=4k is to raise dtrace's default 256 byte buffer size
because log messages are longer than typical dtrace probes.)
dtrace -x strsize=4k -qn 'bunyan*:::log-*{printf("%d: %s: %s", pid, probefunc, copyinstr(arg0))}'
Trace all log messages coming from the "wuzzle" component:
dtrace -x strsize=4k -qn 'bunyan*:::log-*/strstr(this->str = copyinstr(arg0), "\"component\":\"wuzzle\"") != NULL/{printf("%s", this->str)}'
Aggregate debug messages from process 1234, by message:
dtrace -x strsize=4k -n 'bunyan1234:::log-debug{@[copyinstr(arg0)] = count()}'
Have the bunyan CLI pretty-print the traced logs:
dtrace -x strsize=4k -qn 'bunyan1234:::log-*{printf("%s", copyinstr(arg0))}' | bunyan
A convenience handle has been made for this:
bunyan -p 1234
On systems that support the
jstack action
via a node.js helper, get a stack backtrace for any debug message that
includes the string "danger!":
dtrace -x strsize=4k -qn 'log-debug/strstr(copyinstr(arg0), "danger!") != NULL/{printf("\n%s", copyinstr(arg0)); jstack()}'
Output of the above might be:
{"name":"foo","hostname":"763bf293-d65c-42d5-872b-4abe25d5c4c7.local","pid":12747,"level":20,"msg":"danger!","time":"2012-10-30T18:28:57.115Z","v":0}

          node`0x87e2010
          DTraceProviderBindings.node`usdt_fire_probe+0x32
          DTraceProviderBindings.node`_ZN4node11DTraceProbe5_fireEN2v85LocalINS1_5ValueEEE+0x32d
          DTraceProviderBindings.node`_ZN4node11DTraceProbe4FireERKN2v89ArgumentsE+0x77
          << internal code >>
          (anon) as (anon) at /root/node-bunyan/lib/bunyan.js position 40484
          << adaptor >>
          (anon) as doit at /root/my-prog.js position 360
          (anon) as list.ontimeout at timers.js position 4960
          << adaptor >>
          << internal >>
          << entry >>
          node`_ZN2v88internalL6InvokeEbNS0_6HandleINS0_10JSFunctionEEENS1_INS0_6ObjectEEEiPS5_Pb+0x101
          node`_ZN2v88internal9Execution4CallENS0_6HandleINS0_6ObjectEEES4_iPS4_Pbb+0xcb
          node`_ZN2v88Function4CallENS_6HandleINS_6ObjectEEEiPNS1_INS_5ValueEEE+0xf0
          node`_ZN4node12MakeCallbackEN2v86HandleINS0_6ObjectEEENS1_INS0_8FunctionEEEiPNS1_INS0_5ValueEEE+0x11f
          node`_ZN4node12MakeCallbackEN2v86HandleINS0_6ObjectEEENS1_INS0_6StringEEEiPNS1_INS0_5ValueEEE+0x66
          node`_ZN4node9TimerWrap9OnTimeoutEP10uv_timer_si+0x63
          node`uv__run_timers+0x66
          node`uv__run+0x1b
          node`uv_run+0x17
          node`_ZN4node5StartEiPPc+0x1d0
          node`main+0x1b
          node`_start+0x83
Runtime environments
Node-bunyan supports running in a few runtime environments:
- Node.js
- Browserify: See the Browserify section below.
- Webpack: See the Webpack section below.
- NW.js
Support for other runtime environments is welcome. If you have suggestions, fixes, or mentions that node-bunyan already works in some other JavaScript runtime, please open an issue or a pull request.
The primary target is Node.js. It is the only environment in which I regularly test. If you have suggestions for how to automate testing for other environments, I'd appreciate feedback on this automated testing issue.
Browserify
As the Browserify site says it "lets you
require('modules') in the browser by bundling up all of your dependencies."
It is a build tool to run on your node.js script to bundle up your script and
all its node.js dependencies into a single file that is runnable in the
browser via:
<script src="play.browser.js"></script>
As of version 1.1.0, node-bunyan supports being run via Browserify. The
default stream when running in the browser is one that emits
raw log records to console.log/info/warn/error.
Here is a quick example showing you how you can get this working for your script.
-
Get browserify and bunyan installed in your module:
$ npm install browserify bunyan -
An example script using Bunyan, "play.js":
var bunyan = require('bunyan'); var log = bunyan.createLogger({name: 'play', level: 'debug'}); log.trace('this one does not emit'); log.debug('hi on debug'); // console.log log.info('hi on info'); // console.info log.warn('hi on warn'); // console.warn log.error('hi on error'); // console.error -
Build this into a bundle to run in the browser, "play.browser.js":
$ ./node_modules/.bin/browserify play.js -o play.browser.js -
Put that into an HTML file, "play.html":
<!DOCTYPE html> <html> <head> <meta charset="utf-8"> <script src="play.browser.js"></script> </head> <body> <div>hi</div> </body> </html> -
Open that in your browser and open your browser console:
$ open play.html
Here is what it looks like in Firefox's console: 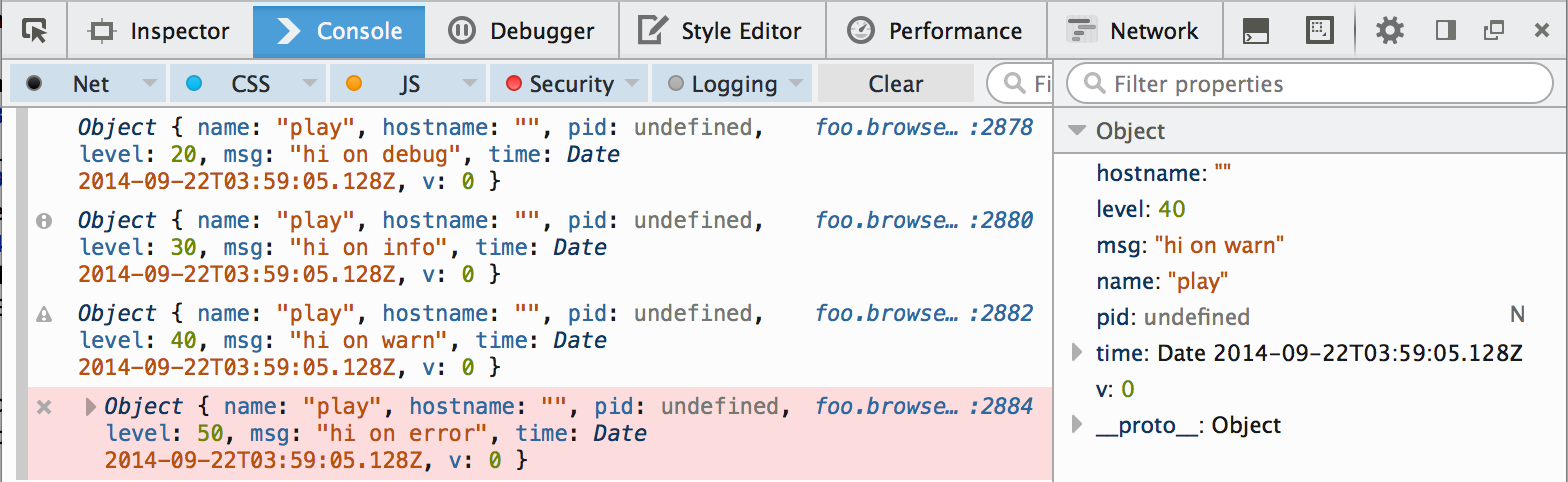
For some, the raw log records might not be desired. To have a rendered log line you'll want to add your own stream, starting with something like this:
var bunyan = require('./lib/bunyan');

function MyRawStream() {}
MyRawStream.prototype.write = function (rec) {
    console.log('[%s] %s: %s',
        rec.time.toISOString(),
        bunyan.nameFromLevel[rec.level],
        rec.msg);
}

var log = bunyan.createLogger({
    name: 'play',
    streams: [
        {
            level: 'info',
            stream: new MyRawStream(),
            type: 'raw'
        }
    ]
});

log.info('hi on info');
webpack
To include bunyan in your webpack bundle you need to tell webpack to ignore the optional dependencies that are unavailable in browser environments.
Mark the following dependencies as externals in your webpack configuration file to exclude them from the bundle:
module: {
    externals: ['dtrace-provider', 'fs', 'mv', 'os', 'source-map-support']
}
Versioning
All versions are <major>.<minor>.<patch> which will be incremented for
breaking backward compat and major reworks, new features without breaking
change, and bug fixes, respectively. tl;dr: Semantic
versioning.
License
MIT.
See Also
See the user-maintained list of Bunyan-related software in the Bunyan wiki.