React Native Image Processing Libraries
react-native-compressor, react-native-image-crop-picker, and react-native-image-resizer are React Native libraries focused on image manipulation, but they serve distinct purposes in the media processing pipeline. react-native-compressor specializes in reducing file size for both images and videos using native compression algorithms. react-native-image-crop-picker provides a complete user interface for selecting, capturing, and cropping images, with built-in resizing and compression. react-native-image-resizer is a utility-only library that resizes images to exact pixel dimensions without any UI component. Together, they address different stages of image handling — from user interaction to background optimization — and are often used in combination in real-world applications.
Npm Package Weekly Downloads Trend
Github Stars Ranking
Stat Detail
Image Processing in React Native: react-native-compressor vs react-native-image-crop-picker vs react-native-image-resizer
When building mobile apps that handle photos — whether for user avatars, social posts, or document uploads — you’ll quickly run into the need to compress, resize, or crop images before sending them over the network. Three popular libraries tackle this space in React Native: react-native-compressor, react-native-image-crop-picker, and react-native-image-resizer. While they all touch image manipulation, their capabilities, architecture, and use cases differ significantly. Let’s break down what each does best.
📸 Core Capabilities: What Each Library Actually Does
react-native-compressor focuses exclusively on compression — reducing file size without necessarily changing dimensions. It supports both images and videos, and uses native compression APIs under the hood (like iOS’s UIImageJPEGRepresentation and Android’s Bitmap.compress). You give it a file path, and it returns a smaller version.
import { compressImage } from 'react-native-compressor';

const compressedUri = await compressImage(uri, {
  compressionMethod: 'auto', // or 'manual'
  quality: 0.8,
  maxWidth: 1024,
  maxHeight: 1024
});
react-native-image-crop-picker is a full-featured picker that includes cropping, resizing, and basic compression as part of its workflow. It opens a native UI for selecting or taking photos, then lets users crop before returning the result. Compression is built in but not its primary focus.
import ImagePicker from 'react-native-image-crop-picker';

const image = await ImagePicker.openPicker({
  width: 300,
  height: 400,
  cropping: true,
  compressImageQuality: 0.7,
  includeBase64: false
});
// image.path contains the processed file
react-native-image-resizer is purely about resizing — changing pixel dimensions while optionally compressing. It doesn’t provide any UI; you pass it an existing image URI and get back a new resized version. No cropping, no selection — just transformation.
import ImageResizer from 'react-native-image-resizer';

const resizedImageUri = await ImageResizer.createResizedImage(
  uri,
  200,    // width
  200,    // height
  'JPEG', // format
  80      // quality (0–100)
);
🛠️ Architecture: UI vs Utility
This is where the biggest architectural difference lies.
-
react-native-image-crop-pickeris a UI-first library. It handles the entire user interaction flow: launching the camera roll, presenting a cropping interface, and returning the final asset. If your app needs users to visually select and trim photos (e.g., profile picture setup), this is the go-to. -
react-native-compressorandreact-native-image-resizerare utility-only. They assume you already have an image URI (from another picker like@react-native-image-pickeror camera capture) and just need to process it silently in the background. No UI, no user prompts — just input → output.
💡 Practical implication: You often combine these utilities with a separate image picker. For example, use
@react-native-image-pickerto get a photo, then pass it toreact-native-compressorfor aggressive size reduction.
🔧 Control Over Output: Precision vs Convenience
react-native-image-resizer gives you pixel-perfect control over output dimensions. You specify exact width/height, and it resizes accordingly (with options for mode: contain, cover, stretch). This is critical when you need consistent thumbnail sizes across a feed.
// Force exact 150x150 square
const thumb = await ImageResizer.createResizedImage(uri, 150, 150, 'PNG', 90);
react-native-compressor prioritizes file size over dimensions. Even if you set maxWidth/maxHeight, the actual output may be smaller to meet the target quality/file size. It’s optimized for bandwidth savings, not layout consistency.
react-native-image-crop-picker offers moderate control — you can set target width/height for cropping, but the final image respects the user’s crop selection. You can’t enforce exact output dimensions if the user drags the crop box freely.
📱 Platform Behavior and Limitations
All three work on iOS and Android, but with notable differences:
-
react-native-image-crop-pickerusesTOCropViewControlleron iOS and a custom cropper on Android. The UI and behavior aren’t identical across platforms, which may affect UX consistency. -
react-native-image-resizeralways outputs to the app’s cache directory by default, which means images may be cleared by the OS. You must move them to permanent storage if needed. -
react-native-compressorsupports video compression (a rare feature), but only on iOS. Android video compression is not implemented as of the latest release.
🔄 Real-World Usage Scenarios
Scenario 1: Social Media Post Upload
You want users to pick a photo, optionally crop it, then upload a compressed version under 1MB.
- ✅ Best combo:
react-native-image-crop-pickerfor selection + cropping, thenreact-native-compressorfor final size reduction. - Why? The picker handles UX; the compressor ensures network efficiency.
// Step 1: Pick and crop
const picked = await ImagePicker.openPicker({ cropping: true });

// Step 2: Further compress if needed
const finalUri = await compressImage(picked.path, { quality: 0.6 });
Scenario 2: Automatic Thumbnail Generation
Your app downloads full-size images from a server and needs to generate 100x100 previews for a list view.
- ✅ Best choice:
react-native-image-resizer - Why? No user interaction needed; you require precise dimensions.
const thumbUri = await ImageResizer.createResizedImage(
  downloadedUri,
  100,
  100,
  'JPEG',
  85
);
Scenario 3: Profile Picture Setup with Strict Size Limits
Users must upload a square avatar under 500KB. You don’t care about exact pixels, just file size.
- ✅ Best choice:
react-native-compressor - Why? Its
autocompression mode intelligently balances quality and size without manual tuning.
const avatarUri = await compressImage(selectedUri, {
  compressionMethod: 'auto',
  maxFileSize: 500000 // 500KB
});
⚠️ Important Maintenance Notes
As of the latest review:
-
react-native-image-resizeris actively maintained, with recent updates supporting React Native 0.7x and modern build systems (Gradle 8+, Xcode 15). -
react-native-image-crop-pickeris also actively maintained, though its large native dependency footprint can complicate builds. -
react-native-compressoris actively developed and stands out for its support of both image and video compression.
None of these packages are deprecated, and all support modern React Native versions (0.68+).
📊 Summary: When to Use Which
| Need | Best Package(s) |
|---|---|
| User-facing photo selection + cropping | react-native-image-crop-picker |
| Precise pixel resizing (no UI) | react-native-image-resizer |
| Maximum file size reduction (images/video) | react-native-compressor |
| Silent background processing | react-native-compressor or react-native-image-resizer |
| Square avatars with strict size limits | react-native-compressor |
💡 Final Recommendation
Don’t think of these as direct competitors — they solve different layers of the image handling pipeline:
- Need a UI for users to pick and trim photos? Start with
react-native-image-crop-picker. - Already have an image and need to shrink its dimensions exactly? Reach for
react-native-image-resizer. - Already have an image and need to minimize file size at all costs? Use
react-native-compressor.
In many production apps, you’ll actually use two of them together — for example, crop with image-crop-picker, then further compress with compressor to hit strict upload quotas. Understanding their distinct roles helps you compose them effectively rather than trying to force one tool to do everything.
How to Choose: react-native-compressor vs react-native-image-crop-picker vs react-native-image-resizer
- react-native-compressor:
Choose
react-native-compressorwhen your primary goal is to minimize file size for network transmission, especially if you need to handle both images and videos. It’s ideal for scenarios where you already have an image URI (from another picker) and need aggressive, silent compression without user interaction. Itsautocompression mode intelligently balances quality and size, making it perfect for enforcing strict upload quotas. - react-native-image-crop-picker:
Choose
react-native-image-crop-pickerwhen you need a complete, user-facing solution for photo selection, capture, and cropping. It’s the right fit if your app requires visual editing — like letting users trim a profile picture — and you want a native-looking UI out of the box. While it includes basic compression, it shouldn’t be your sole tool if you need fine-grained control over final file size. - react-native-image-resizer:
Choose
react-native-image-resizerwhen you need precise control over output dimensions (e.g., generating consistent thumbnails) and already have an image URI from another source. It’s a headless utility with no UI, so it works best in background processing workflows where pixel-perfect sizing matters more than file size reduction. Avoid it if you need cropping or user interaction.
Popular Comparisons
README for react-native-compressor


REACT-NATIVE-COMPRESSOR is a react-native package, which helps us to Compress Image, Video, and Audio before uploading, same like Whatsapp without knowing the compression algorithm
Auto/Manual Compression | Background Upload | Download File | Create Video Thumbnail

🗜️Compress Image, Video, and Audio same like Whatsapp
Why should we use react-native-compress over FFmpeg?
We should use react-native-compressor instead of FFmpeg because react-native-compressor gives you same compression of Whatsapp (Image, Video, and Audio) without knowing the algorithm of compression + it is lightweight only increase 50 KB Size Size in APK while FFmpeg increase ~> 9 MB Size in APK, and we have to give manual image/video/Audo size and quality as well as
If you find this package useful hit the star 🌟
Would you like to support me?

See the Benchmarks
Table of Contents
Open Table of Contents
Installation
yarn add react-native-compressor
New Architecture (Turbo Module) Supported
you can give feedback on Discord channel
Managed Expo
expo install react-native-compressor
Add the Compressor plugin to your Expo config (app.json, app.config.json or app.config.js):
{
  "name": "my app",
  "plugins": ["react-native-compressor"]
}
Finally, compile the mods:
expo prebuild
To apply the changes, build a new binary with EAS:
eas build
Automatic linking (for React Native >= 0.60 only)
Automatic linking is supported for both Android and IOS
Linking (for React Native <= 0.59 only)
Note: If you are using react-native version 0.60 or higher you don't need to link this package.
react-native link react-native-compressor
Manual installation
iOS
- In XCode, open Podfile
- paste this line
pod 'react-native-compressor', :path => '../node_modules/react-native-compressor'intoPodfile - run this command inside ios folder
pod install - Run your project (
Cmd+R)<
Android
- Open up
android/app/src/main/java/[...]/MainActivity.java
- Add
import com.reactnativecompressor.CompressorPackage;to the imports at the top of the file - Add
new CompressorPackage()to the list returned by thegetPackages()method
- Append the following lines to
android/settings.gradle:include ':react-native-compressor' project(':react-native-compressor').projectDir = new File(rootProject.projectDir,'../node_modules/react-native-compressor/android') - Insert the following lines inside the dependencies block in
android/app/build.gradle:compile project(':react-native-compressor')
Usage
Image
Automatic Image Compression Like Whatsapp
import { Image } from 'react-native-compressor';

const result = await Image.compress('file://path_of_file/image.jpg');
// OR
const result = await Image.compress('https://path_of_file/image.jpg', {
  progressDivider: 10,
  downloadProgress: (progress) => {
    console.log('downloadProgress: ', progress);
  },
});
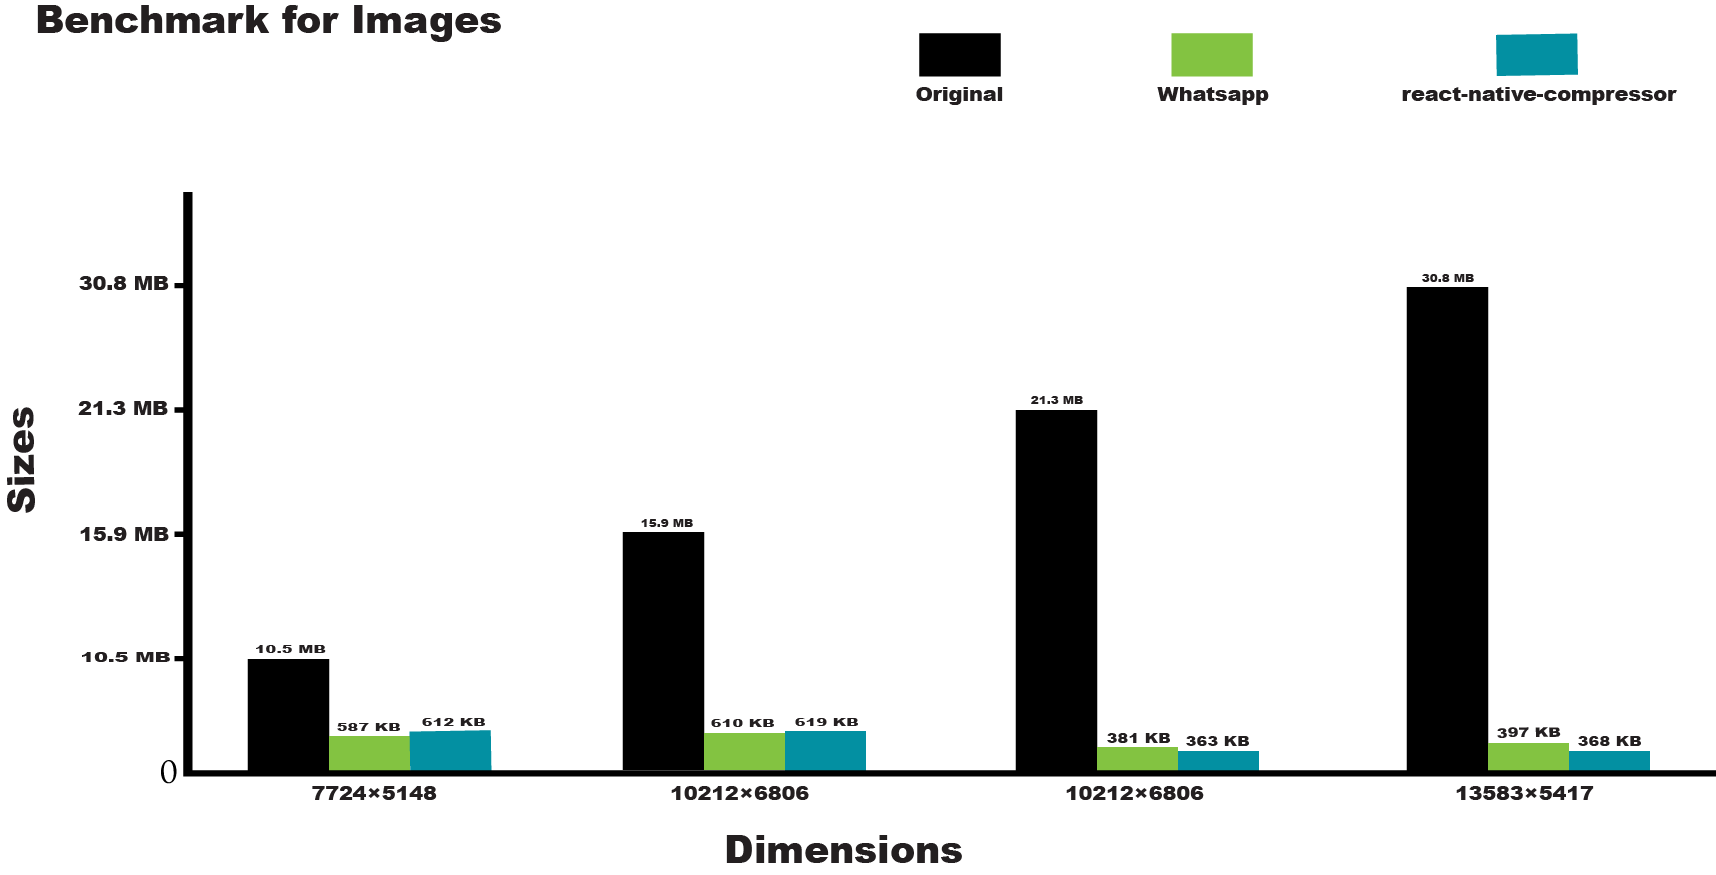
Here is this package comparison of images compression with WhatsApp
Manual Image Compression
import { Image } from 'react-native-compressor';

const result = await Image.compress('file://path_of_file/image.jpg', {
  compressionMethod: 'manual',
  maxWidth: 1000,
  quality: 0.8,
});
Video
Automatic Video Compression Like Whatsapp
import { Video } from 'react-native-compressor';

const result = await Video.compress(
  'file://path_of_file/BigBuckBunny.mp4',
  {},
  (progress) => {
    console.log('Compression Progress: ', progress);
  }
);

//OR

const result = await Video.compress(
  'https://example.com/video.mp4',
  {
    progressDivider: 10,
    downloadProgress: (progress) => {
      console.log('downloadProgress: ', progress);
    },
  },
  (progress) => {
    console.log('Compression Progress: ', progress);
  }
);
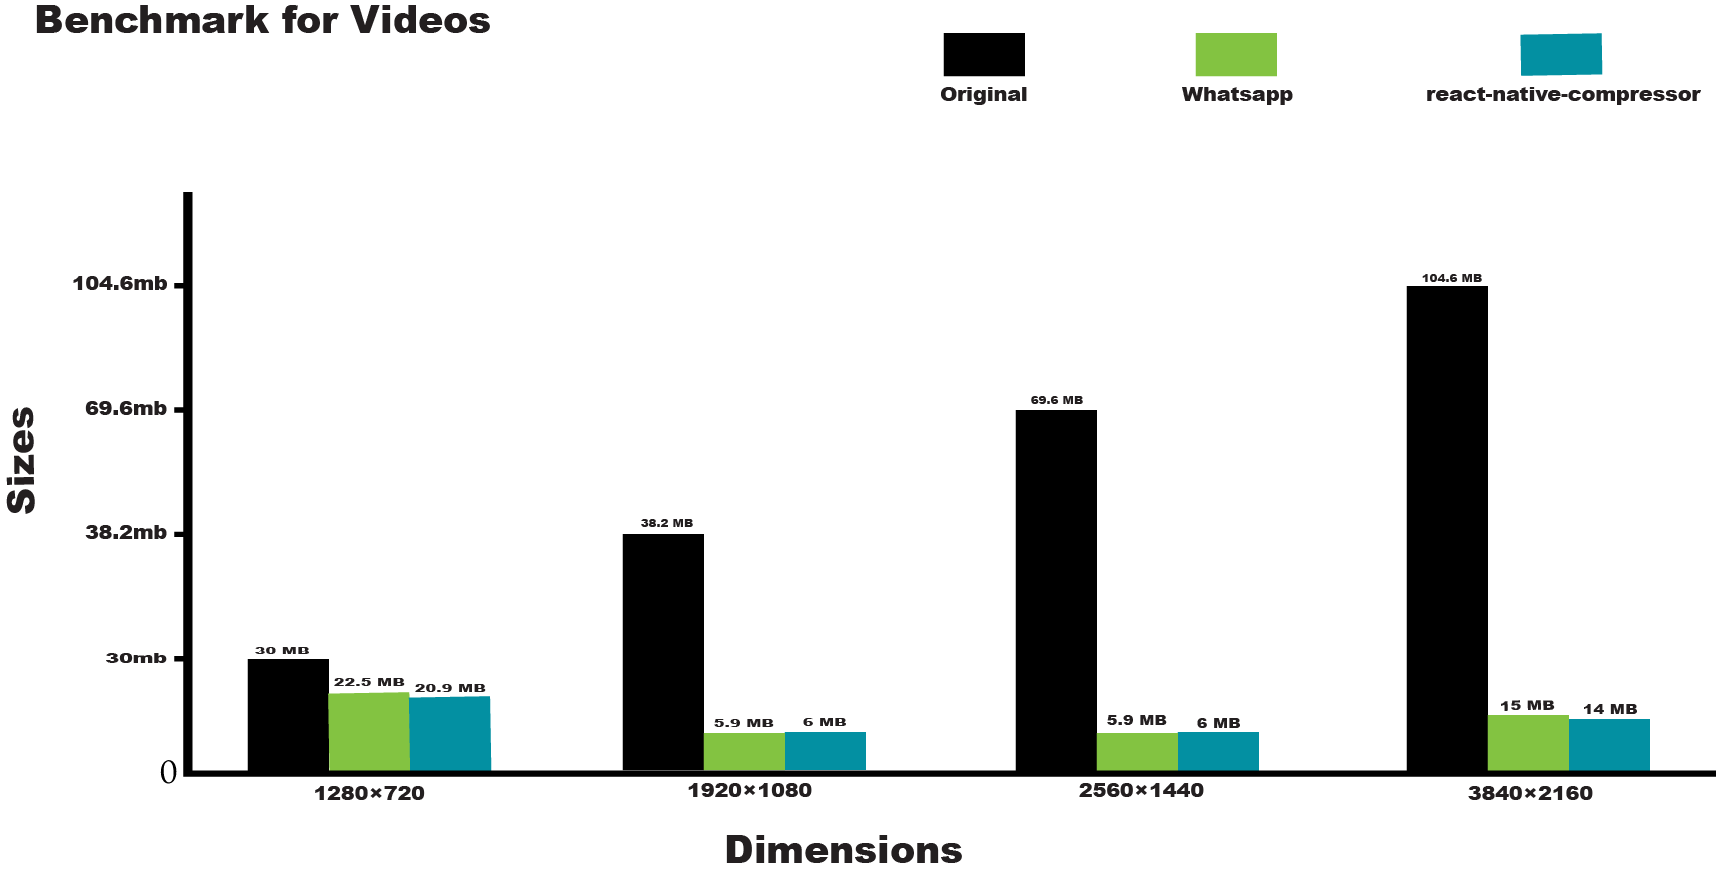
Here is this package comparison of video compression with WhatsApp
Manual Video Compression
import { Video } from 'react-native-compressor';

const result = await Video.compress(
  'file://path_of_file/BigBuckBunny.mp4',
  {
    compressionMethod: 'manual',
  },
  (progress) => {
    console.log('Compression Progress: ', progress);
  }
);
Cancel Video Compression
import { Video } from 'react-native-compressor';

let cancellationVideoId = '';

const result = await Video.compress(
  'file://path_of_file/BigBuckBunny.mp4',
  {
    compressionMethod: 'auto',
    // getCancellationId for get video id which we can use for cancel compression
    getCancellationId: (cancellationId) =>
      (cancellationVideoId = cancellationId),
  },
  (progress) => {
    if (backgroundMode) {
      console.log('Compression Progress: ', progress);
    } else {
      setCompressingProgress(progress);
    }
  }
);

// we can cancel video compression by calling cancelCompression with cancel video id which we can get from getCancellationId function while compression
Video.cancelCompression(cancellationVideoId);
Audio
import { Audio } from 'react-native-compressor';

const result = await Audio.compress(
  'file://path_of_file/file_example_MP3_2MG.wav', // recommended wav file but can be use mp3 file
  { quality: 'medium' }
);

// OR

const result = await Audio.compress(
  'file://path_of_file/file_example_MP3_2MG.wav', // recommended wav file but can be use mp3 file
  {
    bitrate: 64000,
    samplerate: 44100,
    channels: 1,
  }
);
Background Upload
import { backgroundUpload } from 'react-native-compressor';

const headers = {};

const uploadResult = await backgroundUpload(
  url,
  fileUrl,
  { httpMethod: 'PUT', headers },
  (written, total) => {
    console.log(written, total);
  }
);

//OR

const uploadResult = await backgroundUpload(
  url,
  fileUrl,
  { uploadType: UploadType.MULTIPART, httpMethod: 'POST', headers },
  (written, total) => {
    console.log(written, total);
  }
);
Cancel Background Upload
for cancellation Upload, there is two ways
- by calling, cancelUpload function
- by calling abort function
cancelUpload (support single and all)
import { cancelUpload, backgroundUpload } from 'react-native-compressor';

// if we will call without passing any param then it will remove last pushed uploading
cancelUpload()

// if you pass true as second param then it will cancel all the uploading
cancelUpload("",true)

// if there is multiple files are uploading, and you wanna cancel specific uploading then you pass specific video id like this
let videoId=''
const uploadResult = await backgroundUpload(
  url,
  fileUrl,
  { httpMethod: 'PUT',  getCancellationId: (cancellationId) =>(videoId = cancellationId), },
  (written, total) => {
    console.log(written, total);
  }
);
cancelUpload(videoId)
cancel by calling abort
import { backgroundUpload } from 'react-native-compressor';

const abortSignalRef = useRef(new AbortController());

const uploadResult = await backgroundUpload(
  url,
  fileUrl,
  { httpMethod: 'PUT' },
  (written, total) => {
    console.log(written, total);
  },
  abortSignalRef.current.signal
);

abortSignalRef.current?.abort(); // this will cancel uploading
Download File
import { download } from 'react-native-compressor';

const downloadFileUrl = await download(url, (progress) => {
  console.log('downloadProgress: ', progress);
});
Video Thumbnail
import { createVideoThumbnail, clearCache } from 'react-native-compressor';

const thumbnail = await createVideoThumbnail(videoUri);

await clearCache(); // this will clear cache of thumbnails cache directory
API
Image
ImageCompressor
-
compress(value: string, options?: CompressorOptions): Promise<string>Compresses the input file URI or base-64 string with the specified options. Promise returns a string after compression has completed. Resizing will always keep the original aspect ratio of the image, the
maxWidthandmaxHeightare used as a boundary.
CompressorOptions
-
compressionMethod: compressionMethod(default: "auto")if you want to compress images like whatsapp then make this prop
auto. Can be eithermanualorauto, defines the Compression Method. -
downloadProgress?: (progress: number) => void;it is callback, only trigger when we pass image url from server
-
progressDivider?: number(default: 0)we uses it when we use downloadProgress
-
maxWidth: number(default: 1280)The maximum width boundary used as the main boundary in resizing a landscape image.
-
maxHeight: number(default: 1280)The maximum height boundary used as the main boundary in resizing a portrait image.
-
quality: number(default: 0.8)The quality modifier for the
JPEGandPNGfile format, if your input file isJPEGand output file isPNGthen compressed size can be increase -
input: InputType(default: uri)Can be either
uriorbase64, defines the contentents of thevalueparameter. -
output: OutputType(default: jpg)The quality modifier for the
JPEGfile format, can be specified when output isPNGbut will be ignored. if you wanna apply quality modifier then you can enabledisablePngTransparency:true, Note: if you png image have no transparent background then enabledisablePngTransparency:truemodifier is recommended -
disablePngTransparency: boolean(default: false)when user add
output:'png'then by default compressed image will have transparent background, and quality will be ignored, if you wanna apply quality then you have to disablePngTransparency likedisablePngTransparency:true, it will convert transparent background to white -
returnableOutputType: ReturnableOutputType(default: uri)Can be either
uriorbase64, defines the Returnable output image format.
if you wanna get image metadata (exif) then read this
Video
-
compress(url: string, options?: videoCompresssionType , onProgress?: (progress: number)): Promise<string> -
cancelCompression(cancellationId: string): voidwe can get cancellationId from
getCancellationIdwhich is the callback method of compress method options -
activateBackgroundTask(onExpired?: (data: any) => void): Promise<any>if you wanna compress video while app is in backgroup then you should call this method before compression
-
deactivateBackgroundTask(): Promise<any>if you call
activateBackgroundTaskmethod, then after video compression, you should calldeactivateBackgroundTaskfor disable background task mode. -
getCancellationId: functiongetCancellationIdis a callback function that gives us compress video id, which can be used inVideo.cancelCompressionmethod to cancel the compression
videoCompresssionType
-
compressionMethod: compressionMethod(default: "manual")if you want to compress videos like whatsapp then make this prop
auto. Can be eithermanualorauto, defines the Compression Method. -
downloadProgress?: (progress: number) => void;it is callback, only trigger when we pass image url from server
-
progressDivider?: number(default: 0)we uses it when we use downloadProgress/onProgress
-
maxSize: number(default: 640)The maximum size can be height in case of portrait video or can be width in case of landscape video.
-
bitrate: numberbitrate of video which reduce or increase video size. if compressionMethod will auto then this prop will not work
-
minimumFileSizeForCompress: number(default: 0)previously default was 16 but now it is 0 by default. 0 mean 0mb. This is an offset, which you can set for minimumFileSizeForCompress will allow this package to dont compress less than or equal to
minimumFileSizeForCompressref #26
if you wanna get video metadata then read this
Audio
-
Android: recommended to usecompress(url: string, options?: audioCompresssionType): Promise<string>wavfile as we convert mp3 to wav then apply bitrate
audioCompresssionType
-
quality?: qualityType(default: medium)we can also control bitrate through quality. qualityType can be
low|medium|high -
bitrate?: numberRange [64000-320000]we can control bitrate of audio through bitrate, it should be in the range of
64000-320000 -
samplerate?: numberRange [44100 - 192000]we can control samplerate of audio through samplerate, it should be in the range of
44100 - 192000 -
channels?: numberTypically 1 or 2we can control channels of audio through channels, Typically 1 or 2
Background Upload
-
backgroundUpload: (url: string, fileUrl: string, options: UploaderOptions, onProgress?: ((writtem: number, total: number) => void) | undefined) => Promise< any >
-
UploaderOptions
export enum UploadType {
  BINARY_CONTENT = 0,
  MULTIPART = 1,
}

export enum UploaderHttpMethod {
  POST = 'POST',
  PUT = 'PUT',
  PATCH = 'PATCH',
}

export declare type HTTPResponse = {
  status: number;
  headers: Record<string, string>;
  body: string;
};

export declare type HttpMethod = 'POST' | 'PUT' | 'PATCH';

export declare type UploaderOptions = (
  | {
      uploadType?: UploadType.BINARY_CONTENT;
      mimeType?: string;
    }
  | {
      uploadType: UploadType.MULTIPART;
      fieldName?: string;
      mimeType?: string;
      parameters?: Record<string, string>;
    }
) & {
  headers?: Record<string, string>;
  httpMethod?: UploaderHttpMethod;
  getCancellationId?: (cancellationId: string) => void;
};
Note: some of the uploader code is borrowed from Expo I tested file uploader on this backend Nodejs-File-Uploader
Cancel Background Upload
for cancellation Upload, there is two ways, you can use one of it
-
cancelUpload: ( uuid?: string, shouldCancelAll?: boolean) => void
- If we call without passing any param then it will remove the last pushed uploading
- If you pass true as the second param then it will cancel all the uploading
- if there is multiple files are uploading, and you wanna cancel specific uploading then you pass a specific video ID like this
-
we can use AbortController in backgroundUpload Usage
const abortSignalRef = useRef(new AbortController());abortSignalRef.current?.abort();
Download
-
download: ( fileUrl: string, downloadProgress?: (progress: number) => void, progressDivider?: number ) => Promise< string >
Create Video Thumbnail and Clear Cache
-
createVideoThumbnail( fileUrl: string, options: {header:Object} ): Promise<{ path: string;size: number; mime: string; width: number; height: number; }>
it will save the thumbnail of the video into the cache directory and return the thumbnail URI which you can display
-
clearCache(cacheDir?: string): Promise< string >
it will clear the cache that was created from createVideoThumbnail, in future this clear cache will be totally customized
Get Metadata Of Video
if you want to get metadata of video than you can use this function
import { getVideoMetaData } from 'react-native-compressor';

const metaData = await getVideoMetaData(filePath);
{
	"duration": 20.11,
	"extension": "mp4",
	"height": 1080,
	"size": 16940.0,
	"width": 1920
}
-
getVideoMetaData(path: string)
Get Metadata Of Image
if you want to get metadata of video than you can use this function
import { getImageMetaData } from 'react-native-compressor';

const metaData = await getImageMetaData(filePath);
{
  "ImageWidth": 4032,
  "ImageHeight": 3024,
  "Orientation": 3,
  "size": 4127057,
  "extension": "jpg",
  "exif":{...}
}
-
getImageMetaData(path: string)
Get Real Path
if you want to convert
content://tofile:///for androidph://tofile:///for IOS
then you can call getRealPath function like this
import { getRealPath } from 'react-native-compressor';

const realPath = await getRealPath(fileUri, 'video'); //   file://file_path.extension
-
getRealPath(path: string, type: string = 'video'|'image')
Get Temp file Path
if you wanna make random file path in cache folder then you can use this method like this
import { generateFilePath } from 'react-native-compressor';

const randomFilePathForSaveFile = await generateFilePath('mp4'); //   file://file_path.mp4
-
generateFilePath(fileextension: string)
Benchmark
![]() Whatsapp: compresses Images,Videos and Audios in every effect way
Whatsapp: compresses Images,Videos and Audios in every effect way
Contributing
See the contributing guide to learn how to contribute to the repository and the development workflow.
License
MIT